Thursday, July 26, 2012

Finished (sub)Floors!

Insulating the floors was a task that required just grinning and get it done.  Crawling on the gravelly floor and nailing foam sheets to the joists from the underside does not sound like my idea of fun!!  It's a good thing my husband is a diligent man....of course Dad and I helped, but I think the insulation award goes to Gabe.

We had started a couple of weeks ago with the insulation on the dining room/kitchen side, but couldn't finish due to the roof support that was rigged up.  So, we rigged up another support that would rest on top of the floor joist, since it had been on a cinder block on the floor up until then.  Gabe finished it up and then crawled out the crawl space entrance:


Dad and I worked to cut the material around the rubble foundation, which took couple tries:


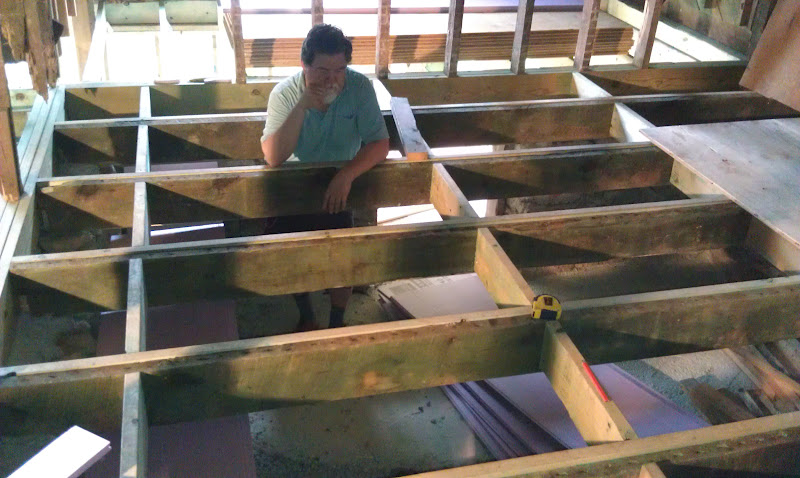
After that was done, it was pretty much smooth sailing until right before the end.  I was gopher extraordinaire (and photographer) which was pretty necessary that day, as it's really inconvenient to get anywhere when you are stuck working under and in-between floor joists!!  Here's a couple photos of the guys at work:


He is willing the tape measure into his hand
Here is a shot of more cut polystyrene around the foundation:


I had to get a picture of Gabe from the perspective of the crawl space!


Home stretch for the polystyrene....


We also had a neighbor stop by to offer to bush-hog the backyard.  We gave him a set amount and he started mowing and weed whacking.  He came back the next day with a different attachment.  It was a good thing, since the grass had gotten hay worthy and we didn't have a mower on site.  How nice!!

The next day, after a delicious pancakes and bacon breakfast, I went on some errands with Mom while Dad and Gabe got started on the house.  As soon as I got there around 11, Gabe was eager to tell me he had a task for me.  Yesterday, I had been getting a bit disillusioned about my helpfulness (as a gopher) so giving me an "important" task was a good move on his part!  :)  His back had been paining him lately so it worked out for me to be the one to staple down the fill insulation.  They had cut plenty of fill insulation and stapled a few of them in place, so I had my work cut out for me (haha).

On a slightly sour note, a couple days previous, Dad had visited the site to find someone had dumped some spoiled food in our dumpster!!  Needless to say, we were not pleased.  Boy, did it stink!  When we got there on Friday, Dad and Gabe dug and dumped dirt on the problem areas, since getting the dumpster removed would be too expensive, since it wasn't even half full.  When we got there on Saturday, more had been dumped!  This time, it was less offensive, being weird old things, including some Spiderman bedsheets.....sheesh!  Here is a complimentary visual:


Not to mention the signs I picked up that morning reinforcing the message that we do not want anymore such items in our dumpster!


So, Saturday, we had quite the system worked out, Dad would cut the insulation pieces since he was donned in long sleeves and gloves:


I would staple said pieces to floor joists---here is a video to detail the experience:


Boy, were my hamstrings sore after a day with that staple hammer   !

And Gabe would employ himself with things like fitting the insulation into the holes so I could be an efficient stapler ;)


Sprayed Boro-care on plywood to go on the floor:


And move plywood and tools from one end of the room to the other, so we could get the insulation under there too.

Mom stopped by and we had a nice picnic lunch right in our living room!

How lovely--split pea soup and egg salad sandwiches taste so good to the laborer!
The funny thing about putting insulation in the floor is that it provides a false sense of floor, because a foot would go straight through if you try to walk anywhere but the floor joists!!  

Ta da!!


Dad then left for the day around 4:00.  The last task was to somehow seal the leaks in the roof so that the new insulation laid wouldn't get wet.  The north addition has a sneaky way of being wet every time we come on the weekend.  Sooo, Gabe asked me to get the ladder out from under the porch, and no sooner did I step foot under did a wasp sting my leg!!  So, I sat that last chore out while I nursed my bee sting with a mud patty.  I remembered a tip from my youth to do so since it would draw the sting out (had it been that long since I had been stung??!?).

Gabe spent a good hour up on the roof finagling around with a sore back and without a helper.

Now the only thing left to do before the plywood subfloor gets glued and nailed down is an inspection. It was scheduled for the next Tuesday.  Lo and behold, it passed and we could move forward!

~~~~~~~~~~~~~~~~~~~~~~~~~~~~~~~~~~~~~~

The next weekend, I wasn't going to make it out on Saturday.  Gabe unexpectedly had to work late on Friday, so we didn't make the trip.  Gabe went by himself and made a day of it with Dad on Saturday.

Apparently, the plastic Gabe put on the roof worked for the most part.

At least he took pictures of the new floors!!

Here are a few:

They started with the southwest corner
They had to cut the 4' X 8' sheets at the ends in order to stagger them.  Notice these boards have been sprayed on the side facing down with the Boro-care, the mildew, mold and termite resistant treatment, previously and will be sprayed on the top face later when the framing gets sprayed.

It was a lot of bending over to glue and nail every board down, so it was a good thing Gabe bought a back brace for the task!


The studs running down the center of the building, right under where the metal I-beam will be placed that will later be removed, needed to be braced while the subfloor got slipped under them:


And then temporarily re-supported:


Remember this?


Now this:


Just notice the exhaust pipe in both and the door hole boarded over in the second.  Major transformation, huh?

The last corner was particularly hard to get nailed into place since, once it is down, it is hard line the grooves up into the edges.

Voila!  if I do say so myself :)

Looking one direction

Looking the other direction

The rest of the floors (in the existing bathroom and porch areas) will not be insulated, so it will be easier to lay those floors.  Also, since the floor joist run perpendicularly, plywood will need to be cut lengthways, requiring our table saw.  So, next weekend it is!  We also plan on removing the rest of the heart pine floors from the upstairs and meeting framers to discuss the next plan of action: FRAMING!!!!  

Soooo excited to see the structure come together.......

'Til next time!

Thursday, June 28, 2012

Bora-Bora Care

This past weekend was about tying up some loose ends before we start on FRAMING!!!  Yay!!  As per the plans, we will be taking out 3 of the downstairs walls and the kitchen/dining room ceiling (it leaks really bad).  We will be expanding up from the kitchen and dining area and framing a master bedroom and bath bigger than the two existing bedroom spaces---they were something like 8' X 12' each.  The footprint of the existing building will not change.

We have had a few weddings to attend since we worked last, (9th & 16th), so this weekend, we were raring to go.  Ok, Gabe was raring to go.  I was dragging my feet.  Gabe had opted to save the $150 delivery charge and pick up our 14' metal I-beam.  And instead of inviting any of his husky male friends to help him unload the beam, he chose.....me.  He ended up having a good system and it wasn't straining at all, it was probably just the intimidation of the thing.  We slid it off the truck and onto the porch, easy peasy.  And there it sits.


After spending some time cleaning the debris out of the kitchen/dining room side of the house, and making sure the ground was covered sufficiently with gravel, I vacuumed the perimeter, where debris always falls, especially from the ceiling.  I wish I could say my job was a bit more glamorous, but alas, it was not.  The next job is to spray Bora-Care, a solution of boric acid (and other not super toxic ingredients) intended to kill mold, mildew, termites and the like.  This was the alternative Dad came up with to buying treated wood, which would have been a whole lot more expensive.  The surfaces that require this treatment are the floor and walls that will remain that are not already pressure treated, as well as the plywood that is going down.  So, in other words, a lot.  The surfaces needed to be relatively clean in order for the solution to stick--hence my insistence the space be vacuumed.

While Gabe was brewing up the concoction, 5 gallons of water for every 1/2 gallon of solution, something else was brewing.  I had yet to experience a thunder/lighting show at the house, so it sure was nice!  The beginning part of the day was steamy hot, so when the winds blew, it felt glorious.

Here is a shot of the drama outdoors:


Such a lovely soaking rain.  It toned our next day of work into one quite beautiful.

We dyed the solution blue so we could tell which areas still needed to be covered:


Even with the air outside getting cooler and the fan blowing right on Gabe, look how sweaty he is!

And what a great choice of facial expressions! :)


Closing in on the end of days work:


Dad was in Minnesota for a conference that weekend.  So we went out to dinner and a movie with Mom to celebrate Gabe's birthday the next day!  
~~~~~~~~~~~~~~~~~~~~~~~~~~~~~~~~~~~~~~~~~~~~~~~~~~~~~~~~~~~


The next day, Saturday, we brought in the 2' X 8' polystyrene sheets from the RV because we were going to install them on the side of the house where Gabe had sprayed the solution.  Little did I know that installation involved lying on our backs in the crawl space!  Also, the solution had dried on the joists as a powdery substance that came off on our hands.  Not too excited about that.  But, we got right down to it, and made sure the first row was straight, staggering the joints so there would be no weak spots.  We were nailing special nails to the underside of the floor joists.  Oh joy.


Here he is, installing the first sheet:


Once we get the polystyrene all hung, we will then put regular insulation on top of it, and then finally plywood. 


We only did about half of the room since there was a brace holding up the ceiling that Gabe didn't want to take out yet.  Next task was to cover up the areas we already did with plywood and transfer all the tools resting in the main space over so that we could start spraying it too.


This involved me cleaning the perimeter with the wet dry vac again as well as sorting the chaos that was in the crawl space.

I also finished securing down a couple of joist hangers that were remaining:

(Gabe thinks this should be my profile picture)
Mom stopped by too, to bring us lunch and to help out.  She moved the heart pine hardwood flooring that we brought down from the 2nd floor a couple weeks ago so Gabe could cover and spray the joists above with out them getting damaged.  We are waiting to re-plane them until we have a safe place to store them out of the elements (or until right before we install it).  She is wearing Gabe's construction hat---how cute is she?!??!


While I was vacuuming out the main crawl space, Gabe was spraying Bora-Bora Care in the other areas, where the bathroom and porch used to be, respectively:


Gotta love the red gloves and the blue spray:


Then Gabe spent a little bit of time mixing mortar and closing up a few holes in the foundation:


And I just took pictures and caused mischief, like usual.


Notice the pile of plywood and insulation in the above picture.  We must have moved the pile at least 2 times---it felt like plywood musical chairs, ei yei yei yei yei!

And that's a wrap!  We have a lot more work to do, but have made a lot of progress in the past few months.

We plan on leaving tomorrow for yet another wedding in Ohio, and then to Michigan to visit Gabe's family.

Have a Happy 4th of July!

Future Stairwell Floor Joists are Finally Hung!

Before I get to far behind....

We are on day 33 of our House Flip project!  Hard to believe we have worked on this for 6 months already.  The goal for the month of June was to have the foundation ready to hire out the framing to be done in July.

The first weekend in June, Gabe's dad came for a visit.  We even got a day's work out of him!  This is my favorite shot of them working together:

No, they aren't posing for this
First they removed the sheathing (shown above).  Then the decision was made to remove the cement block pier since it is in the way of building up the wall on that side (the suspended wall is being supported in other places now).


All gone!!


They need to get everything lined up:


Then they started building up the foundation wall to go under the walls seen precariously suspended here.  They have to secure them onto the pins that are sticking up (shown above).

Meanwhile, I am finishing up securing joists in other locations.  I did a lot of hammering that day!

Talk about awkward

They had to cut the pieces and nail them from the bottom, so they had to create the whole section first, and then install it.


Sadly enough, with all the lumber in the crawl space where they were working, Gabe sprained his ankle.  As you can see above there is a piece of black duct tape covering a substantial cut also from the fall on his right arm.  But that didn't stop him!!!

Look, they are working so nicely together!
That, is a stud.
Next the install:


And done!


Below is a shot of the new crawl space entrance.  It will be a heated/cooled space.  Finally we have a legitimate supporting agent!


Gabe and Dad C. are attaching a ledger board to to the ends of the joists under what will be the kitchen space:


Poor Gabey got a nasty scrape!


Later at home, after Gabe to his boot off, his ankle swelled right up!  

~~~~~~~~~~~~~~~~~~~~~~~~~~~~~~~~~~~~~~~~~~~~~~~~~~~~~~~~~~~~~~~~~~~~~~~

The next day we worked was Friday the 8th of June.  A lot was happening this day!!  We weren't alone---when we got out to the house around 2 pm we found one of Dad's church friends working on some blocking.


Blocking is an important step because it helps secure floor joists.  Notice above the differences in the two spaces--the width between joists.  We had to completely remove all the rotten joists from the kitchen/dining room side (far side) so we replaced them with the standard width: 16 inches.  The main space, in the foreground, which is the oldest part built in the 1890's, is surprisingly in tact.  We didn't replace them but reinforced them with side-by-side joists.  So, they ended up being wider spaced, which entails more blocking: placed at the end of each horizontal plywood joint.

We received a truckload of 4 X 8 sheets of treated and untreated plywood for the flooring, which we weren't exactly ready for, but it will be nice for when we are:


Gabe is prepping the space for the new floor joists:


I measured and spaced out the joist hangers:


The joist soldiers are all cut and ready to be hung:


All these joists were first attached to a ledger board so they could be lowered into the joist hangers at the same time.

Here they are now, getting the finally boards in place:


And voila!

Done and done.
I went back in and secured all the joists by hammering them down:

Action shot!
The last thing we had to do was move all the plywood from the yard to under the roof to keep it from rotting.  There must have been more than 20 sheets!  Hats off to Gabe, who did most of it, like usual :)