I'd love to share what we've been up to around here these last days. Gabe has had a good bit of time off (every other week) so we've been able to tackle some projects that seemed they would never get done! We double up on school on the weeks Gabe is at work and take it slower on the weeks he is home.
Let's get historical for a sec, for comparison sake, and we can see how the front of the house started out.
Super rewind:
 |
| Circa April 2015 |
 |
| August 2019 |
 |
| December 2019 |
 |
| And most recently, April 2020 |
A little bit of a different angle, at the end of 2018:
By the way, that ridiculous flower bed in the foreground is a dumping ground for the plants that needed a temporary home when I had to move them from the area.
Basically the same angle, 16 months later:
Starting out with plans, put together by my dad:
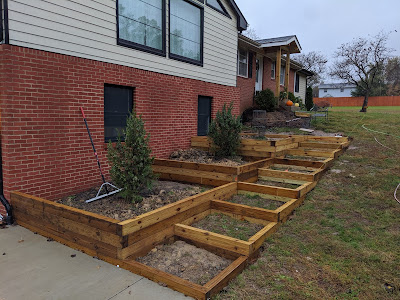
I wanted the design to be modern, relating to the mid-century feel of the home. It is very boxy and linear, imitating the horizontality of the window mullions. It is slightly industrial and I am inspired by the Bauhaus movement from earlier in the 20th century that works "to reunite creativity and manufacturing", honesty of materials, and simplicity--honoring where functionality and aesthetics meet.
And more fun process pics:
Staining:
Filling with a topsoil/compost blend from Virginia Ground Cover:
Had some help:
Errr--kind of. At least they're cute!
Now to get the plantings all in order. I was thankful nurseries were still open for business!
I had held onto two small arbor vitae from Christmas that I planted in there. We got two large-ish boxwoods from my parents last August when we removed the super huge ones. Well, one of them basically died, since it wasn't planted properly with the retaining walls left undone for so long. There are two large juniper like trees that had been placed a year and a half ago (don't know exactly what they are because we got them from clearance somewhere and they were un-labeled) that have done well and only had to be moved slightly to accommodate the structure of the terraced garden boxes.
As seen above, there's the first go around of tree/shrub plantings. The only thing I knew I wanted was a large arbor vitae (bought a 6' 'Emerald Green' arbor vitae) and the inside corner seemed to make the most sense. In my quest for shrubs, I researched deer resistant ones.
 |
| The new boxwood can be seen in the lower right hand corner of the picture |
In the sharp cornered bed is a dwarf globe Colorado Blue Spruce. In the garden bed stepping down from there (a large step down) is a large 'Scarlet O'hara' Pieris shrub (mostly to shroud site lines from the basement guest room and block the view of the only WHITE window amongst all the trimmed out BLACK ones! There is an "Obsession" Nandina in there too, close to the front left corner with a 'Ascot Rainbow' Euphorbia next to it (of which I have more of in the overflow garden bed, that will be removed when all the plants are transplanted out). And in each bed (there are four wide ones) are three different shade Heuchera ("Coral Bells" in 'Citronelle', 'Carmel' and 'Timeless Night')-plants and a Stonecrop sedum called 'Angelina' in each corner. Other shrubs I bought: 2 Chestnut Hill Cherry Laurel, 2 'Japanese Flaming Silver' Pieris and 2 smaller 'Gordo' Boxwoods.
Lots of work planting!
And so.much.mulching.
It makes a lot of difference!
Plus a little, friendly photo bomber!
You can see some of the shrubs/flowers I stacked in the front edge here--In the back on the next step up, I replanted a Japanese Maple 'Red Select' there with a cage around it to double down on deer protection. I planted a Bleeding Heart 'Valentine' next to it to the left. There in the back of the next step down is a lemon-lime Nandina. In front of that, a Chestnut Hill Cherry Laurel. Columbine on the left, next to the wall and Creeping Phlox 'Fort Hill' and 'Bedazzled Pink' in there on the front edge, starting to drape over. Another kind of sedum is in there: Stonecrop 'Autumn Fire', and a poppy from seed (the poppies were here on the property before we moved in: I have been collecting the seeds each year and spreading them the next because I love them so!!) close to the juniper tree.
A fun visual of the evolution of the stair, from the concrete pad:
From the bottom:
From the top:
In the next one, the lower right hand side of the photo shows a graveled area that is the window well of the basement guest room window. It has a drain in there for shedding water.
 |
| From the front porch |
We had fun with it together, even though it was tons of work!
While we are at it, I'll share a few other smaller projects we took on recently, too--
Installing the stairwell light:
Installing house numbers:
Isn't he cute?
A new raised garden bed in the side/back near the fence behind the shed with the chicken coop in place nearby (when they move in, they can eat the bugs!!):
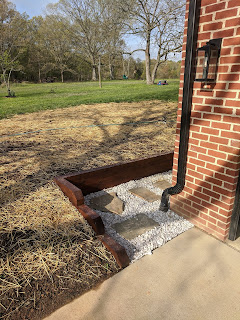
Notice the progress in terracing here: a path leading to the back garage door with bare yard leveled and seeded:
Our landscaping ties supply used for all these retaining walls we bought last year, and it is almost all dwindled away! Gabe calculated that rightly! (he's pretty good at that estimating game).
The grass seed and straw is set! Grow, grass, grow!
And a close up on the finished corner flower bed, around the tree:
I surrounded the flower bed with bricks left over from an 1890's old brick chimney we took out of our last house. I love that it is nearly the same color as we stained the landscaping ties. Here's what we used to stain the ties, it is a 50:50 ratio of Low VOC Australian Timber oil Jarrah Brown and Natural.
There are 5 small Buxus 'Green Velvet' Boxwood lining the concrete pad. I scattered poppy seeds that are coming up around the tree as well as some transplants my mom gave me that I'm waiting to see if they will take. The soil is slightly gravelly but some parts has had better soil added and/or the gravelly bits changed out for the good stuff. We'll see how it does. I have noticed that historically things don't do the greatest there. I bought some Ice Plant ground cover to put in there, so we'll see if it spreads. I bought a dark leafy Cana and a 'Kaleidoscope' Abelia to add some consistency with the garden boxes on the south side of the house.
And deets of the path to the back garage door:
No more muddy entry! I remember one day right after we had installed the garage doors and concrete pad, before Judah had been well instructed on what to do with muddy boots, he tracked the grossest trail of mud onto my nice new concrete garage floor! That might sound a bit ridiculous, but I had to power wash that sucker (or maybe someone else did it) without getting water on the newly installed drywall! At least there wasn't much junk in there yet (notice I said "yet")
And a few more pics.....of garden beds.
We started a few things in the new raised bed in the back despite not having a solid fence around it:
This raised garden bed was done using Gabe's idea to use concrete board with treated lumber holding it together. Also we utilized "hugelkultur"--read about it here my friend Kathleen tipped us off to the concept and it holds lots of promise! I didn't take pictures of all the layers, but I can describe it a bit. First, we laid down big sheets of cardboard on the grass where the garden bed was going. Then chicken wire to prevent critters that dig. Next, the beds were secured with pegs/posts on the sides to keep it from bowing out. Then, we put rotting logs in the bottom and then dead grass and then the topsoil/compost mix. I have since added the plants, put some leaf mulch around the seedlings and then a bit of straw around them too, to keep moisture in.
I bought some established rhubarb and strawberries to cultivate. There's also zucchini in the back. I scattered some dill seeds and foxglove seeds. In the far side, that doesn't have a fence around it yet are the seeds planted--there's watermelon, pumpkin, zinnias, snapdragon, and marigolds.
In here, we have various tomato seedlings, peppers, snap peas, lettuce, Swiss chard, and cucumber.
And, chickens!!
We had them inside until the first weekend in May, at around 6 weeks old. There are 8 there: 2 Welsummer, 2 Brahma, 2 Cochin and 2 Aruacana. We left one inside that was getting hen-pecked a bit from the close quarters, as they were getting bigger. She'll be separated for a week, to let her heal up. We've been working on another fence to go around the coop and the raised garden bed so they have a bit more freedom to roam around it, eating bugs...under supervision, of course, eek! Don't want any hawks to get to them!
Gabe is currently working on transforming the basement/garage entry into a legit mudroom/kitchenette. I don't have much in the way of pictures for the work on the mud room. It's an awkward space and there isn't much visible progress there either--think electrical, insulating and studding the walls out. That will be a separate post at a later time!
For now, signing off!!!


