Showing posts with label windows. Show all posts

Sunday, December 15, 2019

Meanwhile, a year later...

I realize I have been quiet on the blog front for the last year!!  Allow me to update you on our projects from 2019!

First, in January, Gabe worked on the wiring for our TV corner.  It's by no means finished, since we've been focusing on the outside for most of the year, but we got it functional for a Superbowl gathering we hosted.


This spot is Gabe's brain child and his creativity will come to life with this one.  I will save the details on this space for another time!  Cliffhanger anyone?


In February, we welcomed a new little lady into our home ;) Her name is Tirzah and she is a sweetie!!!


In March, we re-installed the basketball hoop.  I think both Gabe and Judah are glad for this!


In April, we bought a shed for extra storage, like the lawn mower and that stinky gas can.


It was not the same color as our house color and black trim (SW 6258 Tricorn Black), so I got a gallon of Hardi-plank's Woodland Cream from SW, Gabe and I teamed up and got out there in the fresh air.  He did the first coats and I did the finishing coats.

Mid-July, we hired out the building of the porch roof. My Dad managed the subcontractor while we went away to Michigan for Gabe's grandmother's 98th birthday party (which happened to take place on Zoe's birthday--Grandma Cropsey's birthday wasn't for another week!).

Getting started:


In August, we tackled the front yard landscaping which happened to include finishing the drainage on the northwest side of the house. The drain pipe was installed about halfway out to the road (can't remember the roadblock we encountered at that time) and it was sticking up out of the ground for a half a year.  Gabe's buddy Mark so generously lent us his bobcat (skid steer) so we could finish the job.

A before picture of a strip of long grass and uneven turf shooting down from the house toward the road:


Zoe enjoying some adventures with Daddy:


We had to get the FIOS line marked out again before digging out the trench for the drain pipe. This took about a day's work to lay the pipe and another day to level out the ground.  Gabe also did some earthworks in the back yard with the bobcat, cleaning up the mess that was created at the end of the season last year right before the frost set in when it was too late to do anything.  He got to smoothing out the tire tracks from where the excavator got stuck in the mud, and he wanted to relocate the berm he created in the back woods for target practice with the extra fill dirt and debris that had been created from construction last year.  It looks much better back there now!

And, since we had the bobcat on hand, we might as well go ahead and tear out those overgrown shrubs, since we in process of changing the landscaping pretty drastically in the front.  This was a fun project on a sunny Saturday over Labor Day weekend!  My parents we over helping out with the kids while Gabe was outside playing with his machinery and I was inside prepping hard for our first term of homeschool, so it worked out great.

And so it begins:


Going a little crazy with the chainsaw:


But having so much fun!!

Devoid of one of them!


And then ripping out the stump:


And they are gone!


A couple weekends later after we had a chance to add some new shrubs back in (thanks Mom & Dad for the two smaller boxwoods, all the help with the kids and planting!)--some rose bushes and hydrangeas along the house where we finished up the grading:


Much, much better.  Still a ways to go, but ahh, sweet progress!

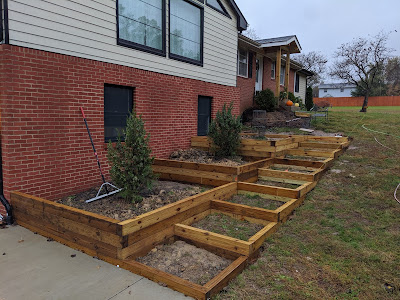
And now for the project that has consumed many weekends this fall, and won't now be finished until the spring: the path leading up to the front door from the driveway that act as stairs, garden boxes and retaining wall of sorts.  Gabe and my dad did some measurements, talked through the plans and Dad drew them up:


Starting from the bottom next to the driveway and working their way up the hill:


It's taking shape!


Looking up, looking down:


In November, our contractor Dave came back! To do some punch list items, replace our existing house windows (a line item that we waited on until we had more $$ to accomplish), paint the new porch addition, replace and paint new fascia/soffits on existing building and have gutters installed.

He installed 5 windows (3 in kids bedrooms, 1 large window in living room, and 1 in bathroom) and is here painting newly installed exterior trim:


And, he painted the front door that day!  (actually he painted the first coat, and since I realized it was a warm day with the next day cooling down quite a bit, I went ahead and painted the 2nd coat that evening to finish it off) You can see all the paint swatches taped up on the door, as I'm frantically trying to decide.  No, actually I was cool as a cucumber about the decision (out of character, you may know--me and decisions don't play well together).  Funny story--my first instinct after taping them all up and not looking at the names was SW 6471 Hazel. I went ahead and asked Judah which one was his favorite, and without knowing which one I was leaning towards said, "Hazel" as well!  Furthermore, confirmation presented itself in the fact that Hazel has been my top pick since 2 years ago when we started this mess.  Badda boom badda bing, moral of the story, don't second guess yourself. ;) :D

Dave, painting the front door:


Voila!


I gadda tell ya, it feels good to have THAT done.  And you have to know I went into my master to do list and crossed that sucker off!!!

Closer up:


Let's pause for a second and take this in.  OOOOoooooooOOO!!!  (pretend you are in the movie Despicable Me for a second and you are watching a sea of minions all in chorus---)

And hello sexy black windows!  Nice to meet you!


Have I gone overboard yet? (Why yes, it is past 11pm while I'm writing this)

Dave, painting the porch posts:


And ripping off the old fascia, soffits and gutters, YES please!!!


Ahhhhhh, finally some cohesion on the front of the house.  Long time comin'!!!


Here's a little throw back from 2017, for the funsies:


Is this real life??!?

And now, before signing off, I will take one more liberty and share a picture of our newest little presh from last July:

picture courtesy of my sister in law, Bethany
Isn't she just somethin' else?


Until next time.....

Saturday, April 28, 2018

Shingles, Framing, & Drywall, oh my!

I'll just jump right in and share what we've been up to with the house projects in the last month and a half.  I have split it up into two separate posts, for easier readability:

For those of you who are list people, here's a list of the things we have done on the house in the last month and a half:
Completed shingled roof
Insulated ceiling of great room
Removed brick on existing house at openings
Shopped for walnut slabs for countertop (some but not all surfaces--we are mixing with granite) in my parent's side yard
More windows installed
Interior framing: peninsula and pantry in kitchen/DR, closets in MBR
HVAC installed on all additions
Cut a hole into our existing living room
Drywalled
Some mudding/taping
Cleared out the existing kitchen
Demoed kitchen!!
Expanded kitchen
Leveled out the flooring from existing to new
Received cabinet delivery
Installed electrical and plumbing in kitchen
Cut another hole into our living room
Removed old flooring in kitchen
Installed cabinets

On the design end of things:
Ordered received cabinet handles
Measured for countertops
Ordered appliances
Ordered hardwood flooring
Ordered some light fixtures
Ordered sink/plumbing fixtures
Shopped to match existing brick/mortar
Ordered sectional for new Great Room!
Designed a built-in walnut desk/TV area in Great Rm
And lots of other things I'm sure I missed!

Here are some details/pics of the process for those of you who enjoy that sort of thing--

Starting with finishing up the shingles on the roof:


An in process shot--not too many of those here, not sure why!


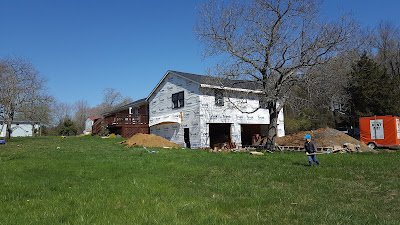
Didn't realize I didn't have any closer up pics of the finished shingled roof until just the other day! So here you go: green grass, blue sky, dirt piles, and little boys with shovels:


Couple windows installed:

Dining Room window about to go in


Large ones going in!  Contractor Dave had Gabe's help on that one:


Sadly, it will be a while before the trapezoid/triangular ones on top are ready to go in:

All suited up with tarp
On to brick removal of the wall coming down to create a bigger kitchen:


A couple of loud days later, the brick was finally removed.

Don't mind the blurry child flash of lightning in the lower right hand corner :)
Dave diligently cleaned old mortar off of the bricks to be used for patch jobs on the west addition, bricking over a few windows.

In which one is seen here:


He removed brick where the doorway will be into the master bedroom.  Where the window is will be another doorway into an ensuite master bathroom (formerly Zoe's room).  The other window being bricked over is to the right of the doorway:

Judah is not super happy his window is being bricked over!

One weekend we went over to my parents place to "shop" for some walnut slabs.  My parents had a walnut tree come down (accidentally landed on their car--but that's another story for another time ;) and got it sawn into slabs for an opportunity such as this.  They have been sitting in my parents yard under a tarp for quite some time now, so we went to go take a look.  The plan is to use live edge walnut for the west wall countertop and the bar top.  We also have in mind to put a built in live edge walnut desk to the right of the brick stack in the Great Room.  So, we were looking at the slabs, and decided on taking two roughly 15' long slabs, approximately 2" thick to get planed down to 1.5" thick for the countertops and a roughly 8' long slab for the desk, this one being about 17" wide.  There were other smaller slabs to be planed down to 3/4" thick to use as live edge shelves on the brick and open shelves in the kitchen.


Isn't this exciting???  I can't wait to see them all cleaned up!!!!!  !!

Next, Dave installed baffles in the Great Room ceiling to vent the air up to the ridge vent to go under the insulation.

Yes, they are pink
Next, here's a before and after of the "cut through" to the existing living space:


Woo hoo!!!

A perspective from the other side:


Some kitchen framing pics:


This next picture shows the opening Dave uses to get into the space so he didn't have to come thru our living room all the time.  It was connected to the front porch by a 2'x12' plank that spanned about 14' and at one end was about 10' off the ground.  Which, ahem, Zoe NEVER walked across without us....


And then, it was time to drywall the ceiling.  But not without first, the excitement of watching the delivery truck unload it.


Dave had someone come help him with drywall for the ceiling, since he was using long 12' pieces.


And then, over in the west wing master bedroom addition:


From inside one of the closets:


Back to just Dave still in the west wing:


Moving around the room clockwise:


More drywall pics in the east wing:

Taken from my existing kitchen window
On to some mudding and taping of drywall:


Taking a walk thru the space, counter-clockwise:


Take one last look at this window wall as it's coming out in a couple days!!!!


Amongst the drywall, mudding and taping, Dave worked with Furlong's Sheetmetal subcontractor to get HVAC set up for the new space.  Fortunately, right after we bought the house in 2013, we decided to outfit it with a bigger furnace (and moved to a better location) that would accommodate a major renovation we were only toying with at the time.  Well, down the road, we DID decide to take on a major renovation/addition project now, didn't we?  So that worked out nicely to not have to deal with that all the while.  It was a relatively smooth 2-3 day process, with a team of about 4 guys working in various parts of the house adding vents, ducts and things.  I asked Gabe one day, "our bedroom (in the basement) is the only one that won't be touched, right??  a sanctuary of sorts with all this reno???"  Nope, think again.  The main trunk line duct runs straight thru our room and Gabe created (since we did our bedroom in the basement ourselves) a removable panel over the duct for just such an occasion.  We had to clear out a space in our room (mostly Gabe's closet) for them to tie in the new venting system with the existing one.  So that is what we did, and boom-bada-bing, back in business, with very little hassle and mess.  I call that a Gabe win!

So, we now have working HVAC for the new spaces.  But, being that there is still one crucial window we are waiting on, exhibit A:


we still have most of the vents closed.  Thankfully, it just so happens to be warming up weather-wise so we aren't needing HVAC quite as much now.  The weather will be a consideration with the cabinets coming in to have a climate controlled space to put them.

Here's the cliff hanger I'll leave you with---

Pictures of a cleaned out kitchen, ready to be demoed!!!!


My "make do" kitchen has a shelf life!!!!  But, we will keep a few things to add to a mud room/kitchenette in the basement directly below this kitchen.  These few cabinets (one base cabinet, microwave shelf, and glass front wall cabinet) we added in the last couple of years will stay in the house, the dishwasher will move into the new space and this butcher block countertop will be made into a kids table eventually...  This old 36" refrigerator will stay downstairs as well.  The sink will move downstairs and we plan to keep the old vintage stove vent we restored back in 2014:
Not keeping backsplash (it's a peel 'n stick tile, meant for temporary use)

Demo day, here we come!!!!

Stay tuned.....