Geesh, so much has happened since I last wrote!! Where do I even start???!?
About the middle of May, we were embarking on the great shuffle. Of furniture. In order to replace all the hardwood floors in the house, we needed to move furniture around like crazy people.
The great room received new flooring in a little over half before we tackled the living room and down the hall to the back left bedroom: Judah's room. That meant that when we received the sectional on the 22nd of May, we couldn't set it in it's final location. It landed in the dining room for a spell.
Memorial day, Gabe took out the flooring in Judah's room. But, before this, we took the opportunity to paint over the teal paint color (under the chair rail) in the old dining room. This room would become Zoe's bedroom and I wanted to start her off with a clean slate. So, we went back to the "SW Dover White" as the rest of the walls were. Also, Gabe framed in the walkway we had used so much into the old dining room. Here are a few pics of the finished space (Dave spackled and painted the patch) along with some before pics, to remember:
We have moved some of Zoe's things into the room already. No more dining room here!
Before Gabe removed the floors in Judah's room, we moved Judah's stuff into Zoe's new room, temporarily. We decided to spend a couple of nights at my parents place so Judah wouldn't be so discombobulated at home without a room.
Gabe removing the floors in Judah's room:
When Dave got back in the space to install new hardwoods in Judah's room, we also asked him to patch and paint over the west window in his room as well, to get it all over with.
A throw back--right after we moved in to the house, we polished up the existing floors with some polish, since they were dried out and in rough shape:
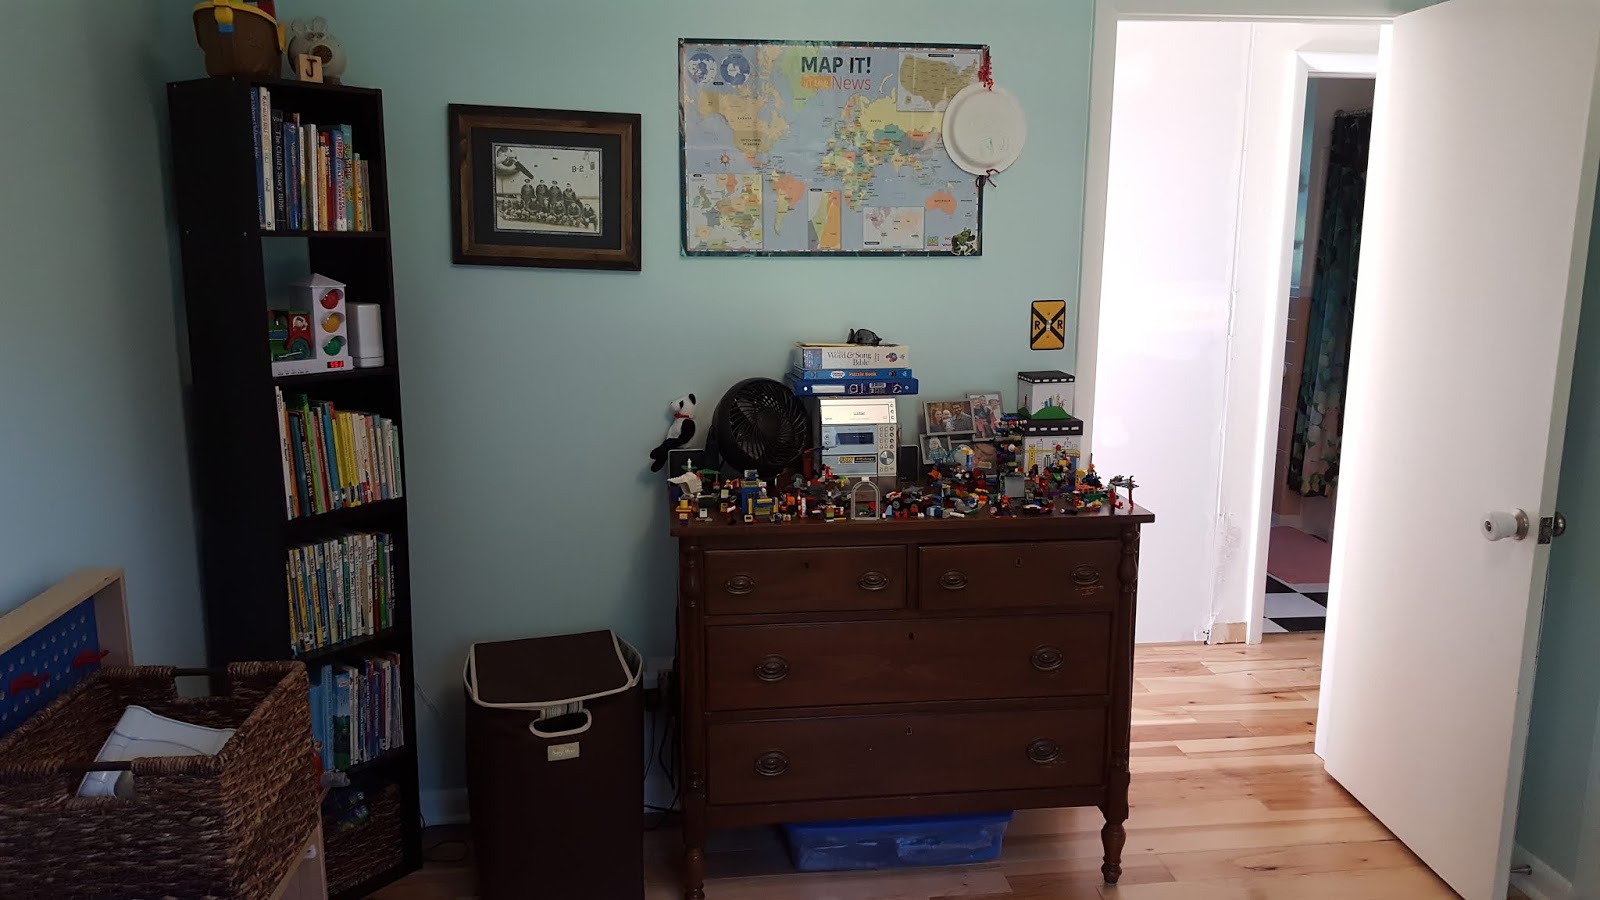
Judah's room, with new hardwood:
 |
| A boy and his Legos!! |
And his west window all patched up:
 |
| definitely bittersweet. |
Humor me for another throwback, to when this room was were we slept (the
master!! it's tiny!!)
 |
| The removed window seen at the head of this bed |
Onward ho to more big changes--commence final demolition!! Up to this point, the master bedroom wing was just hanging out, waiting for us to be able to break thru the wall. Up until now, that entry point was in Zoe's old room (ahem, she slept in there for, maybe one night?), in her closet. So, there was going to be some major jigging around to get the hallway to shoot out into the new space. Hence, final demo.
Closet, no more.
Two "before" pics, with the room set up for both kids, in 2015 and 2017, respectively:
Ahhhhh!! Nostalgia!!!
The break thru, from the "back-side" (master bedroom side):
Closer up:
Now, Dave has a better way to enter the master bedroom space other than thru the window, so he buttoned it up:
That would be the last of the window installation!
Over the course of the next few days, a few more cool things happened--Dave was able to finish up the flooring in the great room, so we were able to move the sectional into it's rightful place, in front of those big, beautiful windows:
The upper feature windows still need trim, but I was able to get curtains on the lower ones for a bit of evening privacy. Also, the plastic film on the windows on the outside is still in tact to protect them when the exterior siding goes up. Bummer for enjoying a clear view outdoors!!! A palpable reminder of my hope in seeing God in His glory someday--"For now we see through a glass darkly; but then face to face: now I know in part; but then shall I know even as also I am known." ~1 Corinthians 13:12 KJV.
Speaking of curtains, the ones done up in the dining room space, I sewed myself from fabric acquired some years ago I've been holding onto for such a time as this:
 |
| Don't mind the mess. |
What fun for me!!! This is a large scale print of cabbages(!) from Ikea:
This is a discontinued fabric, of course. The field color I would call chartreuse, with cabbages in different shades of green: mint and sage, I'd say, with an accent of cobalt blue. I have fond memories of shopping at Ikea with dear friend hannaH(!!!!!) about 7 years ago and snatching up quite a bit of it for "someday". Thankfully, I had enough to give the look I was going for. Look close enough and you can see that the curtains made for the south window (bigger of the two) would not span the length of the window, only good for framing. There would be no real need to cover this window really anyways--we can always buy blinds later!!
A bit more polished view:
We were able to pick up the last of the walnut that was waiting to be picked up from the lumber yard after being kiln dried:
And hanging out in random places in our living space. for now.
 |
| future west wall countertop |
 |
| A stack of a couple things: bar top, desk top and future shelves |
 |
| future shelves |
Pantry shelf design evolved and changed after I realized we really should put our stand up freezer in there after all.
Initial pencil design with the intent of leaving the freezer downstairs:

But after a brainstorm with Dave, he helped me maximize my design to include the freezer and re-jig a few of the shelves with more practicality in mind.
He's getting started on the bottom shelves:
A couple of days later, voila!
It needs a few days (or weeks!) to cure, depending on whether I put shelf liners down first or not. I decided I would.
It's far from organized/finalized, but I wanted to show a picture of the stand up freezer in place.
This stand up freezer is about 30 years old. We are honestly wondering how much longer it will last! But, in the meanwhile, we gave it a spruce up by spray painting it black with
this epoxy:
A before picture of the freezer in the basement mud room:
A slight oversight on our part that might or might not continue to be a problem--we got the freezer up there and thought maybe we should have gotten a louvered door for the pantry since at first it was getting warm in there and needed more ventilation, but as the freezer got filled up again, it cooled itself down pretty well again. We leave it open sometimes and it seems to do the trick!
Dry fit of stove (nope not hooked up yet! even now!) and newly put together island:
Eventually, I plan to paint the base of the island black and spray the handles copper. But that is a project for another time!
Cleaned up a little:
Gabe has spent a good bit of time testing the pressure of the gas line and most recently, we've been waiting for the back yard to be backfilled so we can build a concrete pad on it to secure the gas tank. Details, details!!
Meanwhile, progress is being made on the demo in Zoe's old bedroom, working towards creating the hallway that will shoot into the master bedroom and house a closet for the washer/dryer.
Dad came over and worked towards removing hardwood flooring on some of the area to prep for framing the W/D closet:
Just for fun, from almost the same angle of the doorway into Zoe's old room, let's look at some throw backs: 2015 (Judah) and 2017 (Zoe):
Good riddance on the hardwood floors, but memories of baby rooms? We'll keep those :)
Right at the end of the hallway, there is the HVAC return, as seen here with the grate removed:
And what's left of it coming into Zoe's old room, to the left:
We will need to move it over to get it out of the hallway to the master bedroom. The dangling light switch is cute, isn't it?
On June 21st, before we left for VBS one morning, I have some pics of the kids and contractor Dave after we watched him demo the very last bit of the wall!
And a short video:
When we returned after Judah's VBS, Dave had drywalled/durocked the W/D closet and opened up the doorway to the future master bathroom (what's left of Zoe's old bedroom).
Notice the ceiling of the new hallway to see the footprint of where the walls/Zoe's old closet used to be:
It's exciting to see our design plan being fully realized!
From inside the small future master bath, it's hard to get a good idea of the space, but here are a few pics anyways--looking back out of the space into one of the walk in closets:
And taking a look at the floor of the future shower:
We'll remove the last of the hardwood flooring when we go to finish the master bathroom. That's another project for another time :)
Taking a look at the new HVAC location before it gets closed in:
Freshly installed HVAC done in the following couple of days:
Same angle, all drywalled in:
A little imp about to throw her stuffed dog into the work space:
Guess it's time for a higher barricade!! :D
The next project Dave tackled was a trim detail I asked him to do. Here's the drawing of thus and such:

This is the west wall elevation. The ceiling fan will be located off of the south wall (left side of image) about 5' 5" inches and that is where we would like the bed to be located. The design on the wall brings more order to the fact that the bed isn't centered with the design feature transom windows at the top. Using a little mathematic trickery I believe it does just that. This will act as a "headboard" of sorts for our bed, without actually having one. (Note: I intended the angle of the diamonds to match the angle of the roofline, which it actually does in real life, just not in this drawing because I didn't feel like correcting the roofline pitch on my drawing so late in the game. I just made sure I explained to Dave when I sent him the drawing.) Also, this wall is getting a different color treatment as well. I decided on SW 7047 Porpoise (25% lighter) for this accent wall in the master bedroom.
Initially studying it to make sure all the measurements were on point:
So fun seeing my design vision come to life!!
Finished!
Okay, okay, not
really finished. After the flooring and baseboard trim go in, then the final trim design can be finished. I'll add a
real finished picture later :)
I originally toyed with a couple of different designs but landed on the diamond pattern since I feel like it pulls some architectural features from other places in the house, like the front door for example:
Which also shows that I added the same accent wall color in the living room!
So neat and tidy, our house! :P It's got to get worse before it gets BETTER!!! That's what I keep telling myself, anyway.
Alright, here's a more polished pic:
Moving along to flooring again--now Dave can continue the flooring down the hallway, into the W/D closet and into our NEW bedroom!!!! It's gettin' real, folks!
Can't forget to mention the plumbing in the W/D closet, as well as green board drywall work Dave did in the hallway, which can be seen in lieu of the flooring in said closet::
Back to the flooring:
From the inside out:
Boy, that's a looong hallway!!
A few outdoor projects I should mention--besides continued shenanigans trying to get the stove/oven hooked up, Gabe was able to borrow a bobcat from a friend and get to work relocating a large pile of dirt in front of the garage:
And the numerous trips to the back yard amongst the trees to deposit it:
A project that Dave had hired out--digging out the moat around the house on back of the house (to backfill and get the gas tank installed!! yes please) and the front of the house so he can parge the walls with tar and concrete to seal them:
Also, Dave started drywalling the ceiling of the garage, but couldn't get all the way done until the gas line was inspected:
Lighting was installed too, which is super handy at night :)
Moving back inside again, let's take a look at some finishing touches on a few spaces, like the sliding door alcove:
This "Cape Verde" color doesn't really look that dark, but the camera is really reading it that way, isn't it??
The next few, to be perfectly honest, I almost don't want to show. I don't want to show until they are done!! Something about perfectionism and having a hard time accepting how sllooooowwwwwly certain finishing touches are taking to be done! For example, installation of the bar top, countertop and shelves in the kitchen.
Another BIG one, the lack of pictures on the walls in the Great Room! (I usually have these up right away, but I'm learning to prioritize better I think). Lack of organization in the desk spaces! (seen at the left of previous pic) Progress is slow, but I guess it is what it is, anyway.
I'm loving the "kid" space behind the sectional!
It is an adjustment though, learning how to be diligent in encouraging the kids to clean the space--mostly we forget because we can't see it!!!!
Alright, back to the most recent improvements: finished flooring, trim, lighting and installation of doors on west wing.
A door and track lighting that will eventually act as a "wall graze" light on the brick:
Door from the other side, including a shot of the newly installed W/D closet doors:
Drywalled W/D closet:
More flooring, in master walk-in closet and right outside master bathroom door:
Newly installed fan/light fixture:
Lighting in the two master walk-in closets--can you tell which one has a window with natural light?
The room on the left has a trap door on the floor to the crawl space. Dave still needs to clad it with hardwood.
Lastly, Dave tackled some masonry before leaving for a few days. The two windows in the master bedroom needed to be bricked over.
He started on the left, in between the master bathroom door and the door into the master bedroom, bricking over the west window:
I think it looks pretty good. The mortar is still wet in the picture on the left:
He gets started on bricking over the west window that was in Judah's room:
And ran out of sand, just before he was done--too bad!!
Here's an "after" with the kids running around in the space:
I really wish we had power washed the brick right under the windows before closing in the space! Alas alack, live and learn. I see some brick cleaning in my future...
A few other pics in the space:
Here's the fully finished trim detail pic!!
And some cuties:
And one last picture: a painting to grace the Great Room fireplace stack:
This painting is special because we inherited it from Gabe's maternal grandparents. AND, it was painted in 1963, the year our house was built :) How fun!
"Til next time...