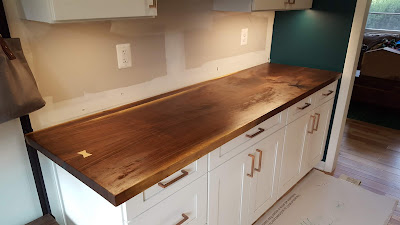
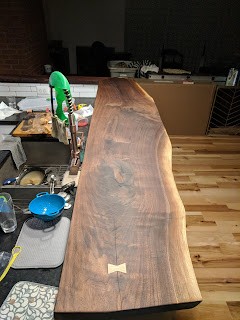
There were so many painstaking steps involved in getting them finished!
Here is the tale of our two walnut slabs.
Back in March 2018, we selected slabs from my parents stash. They have a lot of walnut trees on their property, and one such tree was pretty close to the house, getting so big, dropping walnuts on their driveway. One day, they had a guy come to remove the tree, limb from limb. The guy accidentally drops part of the tree trunk on my mom's vehicle! It was totaled.
But it was time for a new car anyway, so it worked out! Anyways, my parents proceeded to have of some the tree cut into slabs, and they are sitting under a tarp next to their driveway. They were generous to let us have what we wanted from the pile.
So, here's what we selected!
By mid-May, we received the slabs back from Cochran's lumber, after having been kiln dried.
By June, we had a local guy, a church friend of my dad's, join together two bookmatch slabs for the one countertop slab with biscuit joints. Here it is waiting for the next step:
It is too narrow on it's own for the standard countertop width, so Gabe comes up with a plan to join a scrap to the back to make it wider.
By mid-July, he's here gluing and screwing the pieces together:
Another dry fit after trimming down the ends a little:
The next big task is to do a better planing job. After selecting the slabs, we had them planed down, roughly, but then we got them kiln dried after, which we should have done first. Who is to know if we would have needed to plane them down after this step, I don't know, but we saw how warped they were after kiln drying and knew we had made a mis-step.
At this point, Gabe made a special jig to make the pieces flat and down to the thickness we wanted. My morale was low at this point, thinking we will never get these things done! But Gabe stuck to his guns, and really did a good job.
Here he is with a router, planing down with the special jig he made:
And here's a link to a video of the process too, if that helps you understand what is going on better.
Check it out! Still a dry fit.
The same thing was done to the bar top, which happened to be a lot more warped, with a lot more knots and movement in it. No pics of that one, sorry.
The next undertaking is to fill in the knots and cracks with epoxy. We chose a black epoxy, in keeping with the black filler that was in our hardwood floor cracks and knots.
Somehow this next part of the process would take all of August...with letting the product set, it ended up needing a good number of coats--it just kept settling deeper in the cracks and knots!
Once again, my morale was low. It looks so ugly until you after you sand and oil it up!
Is it the final trim and sanding job yet?
Nope.
 |
| Pic taken first day of September |
And now, Gabe preps the pony wall for the brackets that will hold the bar top.
Also, we must come up with a plan for the "trim" piece that will sit on top of the pony wall that returns back into the wall, creating the peninsula. My parents had some really old walnut scraps that had already dried out enough that Gabe glued together and sanded up nice to get to the thickness of the bar top, since it would be joined together with it at a 90 degree angle:
By this time, it's mid-September and speed is picking up a little on progress. Gabe works next on two butterfly joints that will ensure that cracks will not advance:
I'm pretty sure this is the kind of thing that Gabe really loves to do. Wood working.
Ok, slabs are set in place with edges are all cut to size and sanded a final time:
Still a dry fit, mind you. But boy howdy, if they are this gorgeous before oiling, how are they going to look after???
We are going to find out...
(me oiling video link--btw it's long)
Does not disappoint!
Still a dry fit. It still needs to be polyurethaned, silly!
Don't mind me, just admiring the lovely oiled wood in the evening light...
And now for a session in "lessons learned". So. I had done some research, reading Bob Flexner's Understanding Wood Finishing book, and concluded to apply walnut oil to the surface of the wood first. Then, apply a wax-free shellac to seal the wood (wax-less to not repel a coat put on top of it). Finally, do 3 coats (or more) of satin, fast drying polyurethane (would take a half day to a day to dry, depending on the weather, humidity, etc). Well, somewhere along the line (probably all that time that went by from when I did the actual research to when Gabe was actually ready to apply the finishes) we cut out the shellac step. Why, oh why. Well, we learned our lesson in that it took about a week for one coat of polyurethane to dry! We figure it really needed that separation between the poly and the oil, as it did not adhere well. So, Gabe used mineral spirits on the wettest parts to remove the poly and on the rest, he sanded. Oil again, and ready to shellac. Another slight lesson we learned--shellac dries SO fast. We had decided on a foam brush for application, but this was not a super good idea (you can see some of the application strokes under the poly) and switched to a regular paint brush about halfway thru. It's not horrible, but if you look at it in the right lighting, you can see the shellac brush strokes. Then for the three coats of poly, that dried MUCH faster than the initial time! Sheesh. Lesson learned.
Gabe applying polyurethane:
Countertop complete! It is siliconed down to the cabinets this time. Finis!
Now, on to backsplash.
As for the bar top, that took another couple of weeks to get done, because when Gabe installed the 5 brackets, he had to attach them to the studs, thus cutting into drywall to do so. So, Gabe had to patch over the holes and mud, tape and paint them again. Whew.
Attaching this large piece of wood took some doing, mind you. The trim piece that extended around the corner was bouncing up a bit, so in order to get it lay flat, he took some large lag bolts, drilled them into the drywall on the one side, lopped off the heads, drilled matching holes in the walnut on the edge, slipped the bolts into holes where he wanted them, and then he screwed the main part of the bar top to the brackets from the bottom.
Well, glad that's done. Voila!
A few more detailed shots:
Now, I had ordered some bar stools from Wayfair back in May. They are still back ordered! I thought they would surely come before we were finished. But no. Currently, we are told the first of the year. We will see! I really like them, so I think I'm going to keep on waiting. They did give me a 20% off for the trouble, with an additional 10% off coupon towards a next purchase, so that helps.
And that's a wrap!


