Showing posts with label slab. Show all posts

Wednesday, November 21, 2018

Walnut slab countertop and bar top!!

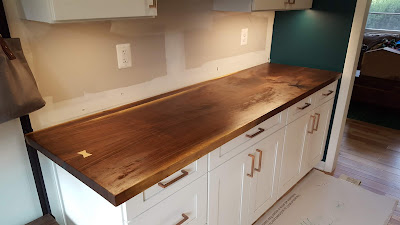
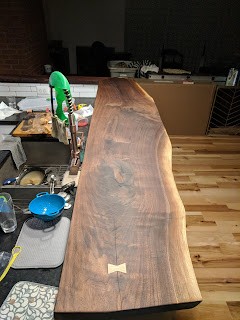
Sound the alarm, the countertop and bar top are finished!!

There were so many painstaking steps involved in getting them finished!

Here is the tale of our two walnut slabs.

Back in March 2018, we selected slabs from my parents stash.  They have a lot of walnut trees on their property, and one such tree was pretty close to the house, getting so big, dropping walnuts on their driveway.  One day, they had a guy come to remove the tree, limb from limb.  The guy accidentally drops part of the tree trunk on my mom's vehicle!  It was totaled.


But it was time for a new car anyway, so it worked out!  Anyways, my parents proceeded to have of some the tree cut into slabs, and they are sitting under a tarp next to their driveway.  They were generous to let us have what we wanted from the pile.

So, here's what we selected!


By mid-May, we received the slabs back from Cochran's lumber, after having been kiln dried.


We had fun imagining what they would be like all finished up:


By June, we had a local guy, a church friend of my dad's, join together two bookmatch slabs for the one countertop slab with biscuit joints.  Here it is waiting for the next step:


It is too narrow on it's own for the standard countertop width, so Gabe comes up with a plan to join a scrap to the back to make it wider.

By mid-July, he's here gluing and screwing the pieces together:


Another dry fit after trimming down the ends a little:


The next big task is to do a better planing job.  After selecting the slabs, we had them planed down, roughly, but then we got them kiln dried after, which we should have done first.  Who is to know if we would have needed to plane them down after this step, I don't know, but we saw how warped they were after kiln drying and knew we had made a mis-step.

At this point, Gabe made a special jig to make the pieces flat and down to the thickness we wanted.  My morale was low at this point, thinking we will never get these things done!  But Gabe stuck to his guns, and really did a good job.

Here he is with a router, planing down with the special jig he made:


And here's a link to a video of the process too, if that helps you understand what is going on better.

After this, it had a lot of little grooves in it that needed to be sanded out.  But it was much more flat after this process!  And more the thickness we wanted.

Check it out!  Still a dry fit.


The same thing was done to the bar top, which happened to be a lot more warped, with a lot more knots and movement in it.  No pics of that one, sorry.

The next undertaking is to fill in the knots and cracks with epoxy.  We chose a black epoxy, in keeping with the black filler that was in our hardwood floor cracks and knots.

Somehow this next part of the process would take all of August...with letting the product set, it ended up needing a good number of coats--it just kept settling deeper in the cracks and knots!


Once again, my morale was low.  It looks so ugly until you after you sand and oil it up!

Is it the final trim and sanding job yet?

Nope.

Pic taken first day of September


And now, Gabe preps the pony wall for the brackets that will hold the bar top.


Also, we must come up with a plan for the "trim" piece that will sit on top of the pony wall that returns back into the wall, creating the peninsula.  My parents had some really old walnut scraps that had already dried out enough that Gabe glued together and sanded up nice to get to the thickness of the bar top, since it would be joined together with it at a 90 degree angle:


By this time, it's mid-September and speed is picking up a little on progress.  Gabe works next on two butterfly joints that will ensure that cracks will not advance:


I'm pretty sure this is the kind of thing that Gabe really loves to do.  Wood working.

Ok, slabs are set in place with edges are all cut to size and sanded a final time:


Still a dry fit, mind you.  But boy howdy, if they are this gorgeous before oiling, how are they going to look after???

We are going to find out...

(me oiling video link--btw it's long)

Does not disappoint!


Still a dry fit.  It still needs to be polyurethaned, silly!

Don't mind me, just admiring the lovely oiled wood in the evening light...


And now for a session in "lessons learned".  So.  I had done some research, reading Bob Flexner's Understanding Wood Finishing book, and concluded to apply walnut oil to the surface of the wood first.  Then, apply a wax-free shellac to seal the wood (wax-less to not repel a coat put on top of it).  Finally, do 3 coats (or more) of satin, fast drying polyurethane (would take a half day to a day to dry, depending on the weather, humidity, etc).  Well, somewhere along the line (probably all that time that went by from when I did the actual research to when Gabe was actually ready to apply the finishes) we cut out the shellac step.  Why, oh why.  Well, we learned our lesson in that it took about a week for one coat of polyurethane to dry!  We figure it really needed that separation between the poly and the oil, as it did not adhere well.  So, Gabe used mineral spirits on the wettest parts to remove the poly and on the rest, he sanded.  Oil again, and ready to shellac.   Another slight lesson we learned--shellac dries SO fast.  We had decided on a foam brush for application, but this was not a super good idea (you can see some of the application strokes under the poly) and switched to a regular paint brush about halfway thru.  It's not horrible, but if you look at it in the right lighting, you can see the shellac brush strokes.  Then for the three coats of poly, that dried MUCH faster than the initial time!  Sheesh.  Lesson learned.

Gabe applying polyurethane:


Countertop complete!  It is siliconed down to the cabinets this time.  Finis!


Now, on to backsplash.

As for the bar top, that took another couple of weeks to get done, because when Gabe installed the 5 brackets, he had to attach them to the studs, thus cutting into drywall to do so.  So, Gabe had to patch over the holes and mud, tape and paint them again.  Whew.

Attaching this large piece of wood took some doing, mind you.  The trim piece that extended around the corner was bouncing up a bit, so in order to get it lay flat, he took some large lag bolts, drilled them into the drywall on the one side, lopped off the heads, drilled matching holes in the walnut on the edge, slipped the bolts into holes where he wanted them, and then he screwed the main part of the bar top to the brackets from the bottom. 

Well, glad that's done.  Voila!


A few more detailed shots:


Now, I had ordered some bar stools from Wayfair back in May.  They are still back ordered!  I thought they would surely come before we were finished.  But no.  Currently, we are told the first of the year.  We will see!  I really like them, so I think I'm going to keep on waiting.  They did give me a 20% off for the trouble, with an additional 10% off coupon towards a next purchase, so that helps.

And that's a wrap!


Tuesday, May 22, 2018

Getting close to the finish line with countertops, hardwood flooring, appliances....the fun stuff

I'll try not to leave you hanging too long with the improvements I promised so soon last time---where did we leave off?  That's right, the day before countertop installation.

Welp, that was a big day in our house addition history.  We received two deliveries that day, 2000 sf of solid hickory flooring (89 boxes) and black granite countertops for most of the kitchen.  (If you may recall, we are also doing a few surfaces in the kitchen/great room in walnut slab.)  Our countertop install was scheduled from 10-12 in the AM and hardwood delivery window was scheduled from 2-4pm. As it turned out, the hardwoods showed up around 11am, and I thought for sure the countertops were going to come at the same time.  Dave diligently and methodically brought in the 89 boxes by himself (we had semi-planned for Gabe to be home for when the delivery would come in the afternoon, but he had meetings so nada chance) since the sun started shining brightly at that time and he thought it better to bring them in.  The kiddos had a chance to do some (rare) movie watching during that time, since Dave was in and out of their main, normal play space for at least an hour.


Boy, was I eager to open up that first box of hardwood!  The six sample boards I got before purchasing didn't really do the flooring justice--in a good way.  I was (and am) very happy with what we selected!!!


It's a good thing, because I spent a LOOOOONG time shopping for those puppies.  And the moolah, can't forget that, they were a pretty penny!

Lo and behold the countertops didn't come at the same time as the hardwood delivery (cuz where would the truck get thru?) thankfully, but we ended up looking at our watches until about 2:30pm when they finally rolled in for countertop install.


I'm very pleased with the granite countertops too!  So nice!  They are antiqued black, which in reality is more like a dark, dark mottled gray that has a matte finish to it.  Very similar to what we had put into our first house, but a little bit more of a smooth finish.

You must know that the countertop install didn't go off without getting my sink installed too, since I decided on an under mount application.

Voila!


I love it!  I went modern with the sharp squared off look.  I hope those corners aren't too hard to clean!  All in the name of design...sigh.


I'll throw this pic in there too, since we had these two openings revealed all day today (first time I had seen the right side opening!) so it can be seen how the existing space we live in relates to the new space we are adding:


A pic looking from that entry into the kitchen from the living room:


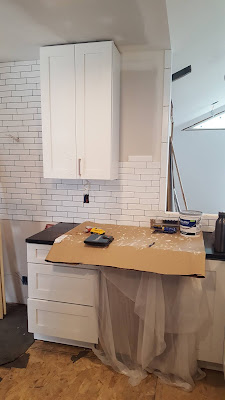
That evening, we jumped right into backsplash tile, which we had received the day before.  I chose a 2" x 8" white matte tile in a "randomized brick pattern".  There is a pattern, but it's a little looser and so it looks more like organized chaos.  Kind of like how a live my life :D

The tile here.  A good little tile company based out of Michigan, close to Gabe's stompin' grounds :)  They were sweet to work with us to get the bullnose tile corrected expediently, the color was off due to manufacturer error, so we had a larger size 4" x 12" tile sent and we cut it down to the correct size.

Backsplash commences:


Backsplash grouting:


Working on the bullnose on the wall section that will receive walnut open shelves, when they are all cut down and ready:


Next, Dave cut the opening for the new sliding glass door going out the back deck:


From the inside--also we replaced the window there over the counter:


Brand new slider!!


And a bumpkin sitting on the platform he's allowed to stay on, to watch:


Let's see, the next few things happened all in a flourish, some in tandem--I'll start with the flooring Dave accomplished so the fridge could be recessed into it's spot:


Appliances delivery:


We went with Whirlpool and were able to get a fabulous discount due to a wonderful cousin of Gabe's--thanks Ricci's!!!  We got a new fridge, stove/double oven, microwave to mount, range hood, sink disposal and a few other small kitchen appliances with the discount.


Dave needed to paint the kitchen color behind the fridge before he could recess it into it's spot--get ready, it's bold!!  Sherwin Williams, 6482 Cape Verde, comin'-at-cha!


A couple others to see the richness and beauty of this color:


Note that it is only one coat.


Beware of this color's low LRV (light reflectance value) of 7%.  For comparison sake, the black I chose for exterior trim (SW 6258 Tricorn Black) is 4%.  So it needs a lot of light to not feel like a cave.  Use judiciously!

A sneak peak at the pendant lights can be seen above--a copper bell shade from Pottery Barn that compliments the kitchen wall color and blends well with the exposed brick accents as well.


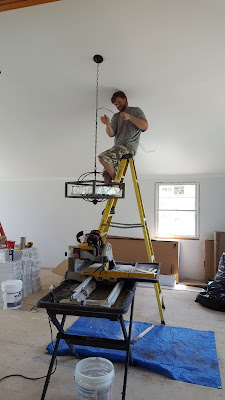
Here is Dave installing the chandelier that will go over the dining table.  He decided to get the lighting installed after finishing painting the ceiling so he wouldn't have to use the ladders on the new floors to install them.


After installing it at the right height, he looped it up to make it higher temporarily so we wouldn't hit our heads for the time being.

I took an opportunity to unload storage and fill up cabinets with kitchen stuff a couple weekends ago:


Above, you can see most of the cabinet handles have been installed.  Here is the link to what I got.  It's a antique copper finish to jive with the sink faucet and copper pendants in the kitchen.

Moving on to some shots detailing the progress on the flooring installation:


Now, the whole kitchen has flooring, yay!


My dishwasher is about to be installed too, yay!  Other things done that aren't easy to see completed: microwave and sink disposal are now installed.

really like my hardwood floors.  Yay.  Did I mention yay for flooring? Nah? YAY!!!

Dave installing window trim (and see more floors):


Another exciting element--last week we were able to travel to the (semi) local mill to pick up our kiln dried slabs for countertops, bar top, desk and shelves applications.  It was a rainy day, so we were dodging around rain drops and meeting cut off times, but we managed to get some of the wood home to acclimate in the space and see what we are working with.

In transit:


You can see the dining room chandelier all lit up here:

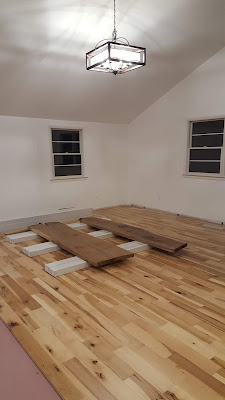
Walnut slabs just hangin' out

Dry fitting the bar top:


The ends still need to be cut to size :)  but the live edge we want to keep!

And west wall countertop:


In this picture, the wood overhangs a good bit on the left, but we will be cutting it off to be only about an inch overhang.  Also, the tile backsplash will be going on this wall as well.

We realized we have a lot to do to get it ready for the walnut slab installation.  Not sure yet if Gabe will be doing the work or hiring it out.  For the countertop, the slabs will need to be planed down better to match each other and the seam will need to be straightened out.  We are thinking it might have gotten wavy by drying out unevenly in the kiln?  Also, we had envisioned the wood being kiln dried first and then cut, but it didn't happen that way.  We will need to use a biscuit joiner to join the two pieces together and then glue/clamp them.  They will need another go with a sander to get them even smoother and then Gabe has a mind to do some butterfly joints in there where there is cracking on the bar top.  Whew!  I'm getting tired just thinking about all that work.

Dave did a little more sanding, priming and painting of the kitchen last week:


In the last picture, the gas line can be seen peeking out from the back corner of the stove cut out.  Gabe ran that last week in preparation for getting the propane tank put in for our gas stove.

Dave worked to get the trim painted and quarter round installed last Friday so we could start out furniture shuffle for getting new hardwood floors everywhere.

We moved in some over our living room and dining room furniture into the new space in preparation for removing old/installing new hardwood in there this week.


Bright and early, (at 11am) Gabe got to work removing old hardwood floors in the living room.  Our wonderfully generous neighbor Brian came over to help us out.  My parents came too, being super helpful, with Mom occupying the kids, while Dad removed nails from quarter round we wanted to reuse.  I was busy scurrying to move around furniture so they could move on the the dining room when they were finished.

The contrast between the old wood floors and the new ones here is pretty marked.


Off they go to the races:


They went at a pretty good pace together.

After a while they got started on the dining room:


They had a pretty good system going.  Dad helped take the old flooring down and out to the garage to storage until we can get it sold.  


Any body want about 300 sf (decent condition) oak flooring?  We decided not to plane it down and refinish (although we could have) the floors because we had such horrible squeaks in the nailed down subfloor underneath that it just wasn't worth it (in time, removing nails and things) to take it up and put it back down again.  So, all that to say, the floors we are looking to sell are still usable and would shine up just fine.

We decided to stay a couple of nights at my parents place over the weekend and into this week since the fireplace spray job was so stinky and the flooring installation starting on Monday would be pretty loud and invasive for the kids to be around for.

Gabe worked to screw down the subfloors on Sunday so Dave could get started Monday.

I did stop by Monday afternoon to get more clothes (!), weed whack and have a conversation with the contractor.  He was working to prep/level out the subfloors.  There were two spots that needed a good bit of attention.  He's getting ready to start!


And here are the pics he just sent us of the finished floors in the living room!


Not to forget the spray painted fireplace:


We plan to add a small, black wood bead detail around the hearth brick to hid the edge and minimize stubbing of toes.

A few more detail shots with surrounding details included:


Can it be?  I was able to dig up a "before" pic of the fireplace from right after we moved in, about 4 years ago (before Judah could crawl!!!!)


And a before pic from before we even bought the place!! Before Judah was even born...


So much staining in the interior of the fireplace box, even after I gave it a good scrubbing.  Also, you might notice the hearth brick is not the same color as the face brick.  What's up with that?  Hence the mask and spray, with a high-heat black semi-gloss spray paint in both places, keeping the face brick in tact.

Dave worked on trim and quarter round painting and installation today.  I have yet to see the days work.

Be on the look out for flooring finished in Judah's bedroom and the new master bedroom, adding washer/dryer on the main level cutting into "Zoe's room" (she is still in our room and her room will become what was the dining room) as it were, which will become a master bedroom, eventually.  Later on, you will see stove/oven installation, walnut slab installation and exterior cladding coming to fruition!

Until next time!