Showing posts with label microwave. Show all posts

Sunday, October 11, 2020

Evolution of the Mudroom/Kitchenette

With Gabe working his day job every other week, we were able to accomplish more on the house than we ever dreamed!  Honestly, I had felt like the house to-do list was impossibly long and didn't think we'd get near as much done on the basement as we did.

First, let's talk about the mud room. The vision was to create a space that functions as a mudroom and a kitchenette so that when we have visitors down there, for a night or two or a short term stay, they can have a little bit of independence and privacy. We want to provide countertop space, a microwave and functioning sink. There is a fridge/freezer right outside the basement door in the garage as well.

We can start with a look down memory lane at we found the space in 2014 (after the furnace had been moved to the other end of the house--one of the first things we did when we bought the place in 2013):

The furnace would have been next to the door to the left

Let's go through the evolution of the mud room.

From the get-go, we had a large open basement space split up by this staircase that came straight down. Near the end of 2015, we worked to turn the staircase so that we could enclose a sizable bedroom in that area, with the stair entry and discharge shooting straight towards the basement/garage door.

More efficient, see?

In mid-2016, Gabe moved the water heater to the other side of the basement, to be enclosed in a utility room:


An old freezer was put in its place for temporary. Always nice to have extra freezer space!

As it can be seen, we housed our washer and dryer down partially behind the stairs. It was down there until around August 2018, when we had built a space for it upstairs in the hallway next to the master bedroom.


Before (10/2016) and after (9/2017) the doorway to the bonus room was built:


By Thanksgiving of 2016, we had moved downstairs to the basement bedroom and it would serve as the master bedroom until our major addition was done (we moved in to our new addition master bedroom Thanksgiving of 2018!) Zoe was downstairs in that room with us. It was a blessing that the room was large enough for all of us to be in there comfortably. We went from a 10'3" x 12'9" bedroom space to a 12'6" x 16'6" size room!

From the doorway of the mud room looking into the finished space:


Back to the mudroom.

It remained unfinished though, for quite some time! Through our major additions upstairs, from the end of 2017, through spring of 2020, we basically did nothing in the mudroom, besides infrastructure like plumbing and electrical which are hard to photograph into something meaningful :)

Finally, in the spring of 2020, when Gabe had some time off due to the Coronavirus pandemic shutdown, we had an opportunity to tackle the space and get it up to speed.

Here's the mudroom in March 2020, in all it's red lights and baby chick housing glory:


Not to mention housing (more or less organized-ly) shoes!


First order of business is to get the extremely heavy slop sink out of the space so we can drywall the back wall (he had already managed to put polystyrene behind for insulation).

Gabe keeping all the plumbing straight--I don't know how he does it!!


The metal base the sink sits on crumbled under the weight of the sink--thankfully it didn't land on my toe! --as we managed to set the thing on its side to get it outta there:


A little sweetie posing in front of the newly framed wall:


Another cutie "helping" daddy attach drywall to the stud wall:


Apparently I didn't get too many pictures of the process of insulating, drywalling and mudding the space. Here's one awkward one, and you can see some of the constant shuffling around of the furniture and tools in there until the flooring was down and cabinets were in to house all the things that were in there that needed storing.


We did the next part slightly out of order--we put vinyl planks down first and then painted. Chalk that up to my impatience to see how the flooring would transform further what had once been a dingy, dark, dank little intersection of a space!

Flooring going down as shown on the sink wall:


Panning right, you can see how Gabe handled the framing of the doorway/hall under the stairs:


First he put a header in under the stairs and cut away the triangular part that was jutting down into the walkway. There is a slight bulkhead in the ceiling where the supportive header comes down and panels cover it (the ceiling panels/trim are not entirely finished).

Stairs wall:


And then paint!


And then looking at the wall to the right, the door to the guest room:


Panning to the right again, looking at the wall adjoined to the garage:


We painted some panels to stick up on the ceiling:


Here's where it gets really fun! I have been staring at this UGLY window for a long time (over 5 years!) and it's super inefficient energy-wise. SO, imagine my excitement to get to REPLACE it!!!!  YAY!!!

Remember?


From the outside, before the deck covered it up:


It's not even glass--it appears to be some sort of shoddy plexiglas that will never fully clean off it's been scratched so much.

YESSSSS!!!!


Woo hoo! And that embarrassment of cords and wires in the upper left corner are our ethernet connections and routing for the entire house. Once Gabe wired the outlet that will go up in that corner, they will get neatly tucked inside a wall cabinet, as soon as we get it (it was backordered a few days).  You can also see the panels installed on the ceiling--just know the seams will be covered with a trim detail, in time, in time.

We picked up our cabinets, from our contractor friend who got them cheap from a wholesaler, in August (all except the backordered one), all for less than $1500. We had a few cabinets we re-used from the kitchen we tore out upstairs, but honestly, the base cabinet we were really counting on wasn't savable. Back in the throes of our major additions it was left out in the garage when we'd had a few floods in there before the drainage was taken care of properly. The cabinet got all warped and moldy on the back. So, it will be used in my pottery studio shed someday, but until then, we got a new base cabinet instead.


It's plain to see that we mis-aligned the cabinets and window, so that was a bit of a bummer. It will become more clear when the sink and faucet are in place on the sink base. I kept telling Gabe throughout the project down there whenever he'd fuss over some detail, "it's just a basement!" so we could get a move on and now, after I have harped on the mis-alignment, he likes to remind me of my statement, "it's just a basement!" Oh well. You live and learn. And you learn to live with your mistakes.

We bought a 12' walnut butcher block sheet at Lumber Liquidators mid-August and gave it a quick cut at 5' to transport it and will cut off the excess when Gabe's ready for the final install. For now, they are just resting on the surface, accumulating tools and junk. It will be a wider opening for circulation through to the bonus room, in time, in time.  The walnut butcher block choice is intended to be a more cost conscious nod toward the materials we have upstairs without upstaging them. I think it will come out beautifully once it's oiled and sealed up.


In the picture looking down the hall to the bonus room, you can see the slight drop in ceiling to accommodate the support piece that enabled Gabe to cut out part of the stairs.

Here's a little better picture of what the closet under the stairs looks like:


Looking back towards the door to the garage we installed a bench, some hooks and shelves:


This bench, Gabe worked to give a built-in look. Eventually, I'd like to replace or recover the cushion since white in a mud room is proving to be a baaaaad idea. The wall mounted shelf and hooks were not a matching set with the bench, but I think they marry nicely. The chrome hooks might get some spray paint at some point, but for now that's not high enough on the priority list.

Gabe installed some of the under cabinet lighting as well. One of the overhead can lights is flickering so we took it out and it's nice to have a bit more light on the subject! The sink will go right there in the middle and the bar with hooks will hold the fake herbs from Ikea :)


It's coming together!

And one more with the rug I bought! It's jute and should hold up nicely to the dirt and mess of a mudroom. The color is pretty homogenous to the flooring, but it doesn't bother me and feels like a subtle design touch without being showy. I am going to add cobalt accents to the space in the form of my pottery from college that have been in storage for waaayyyy too long ;)

You can see that the last panel that was missing on the ceiling above the shelves is now in place.


Gabe had to go back to work abruptly at the beginning of September so our plans to finish the countertop slowed down considerably.

First, Gabe filled a few small voids in the butcher block countertop with black epoxy. Then he sprayed them with shellac. Lastly, he painted on the polyurethane coating and they took up space in the garage for a week or so:


Did I mention we got baby chicks?


To say the kids are enamored would be an understatement ;)

Next, Gabe cut the hole for the sink:


And dropped it in!


You can see how wonderful the walnut looks here.

Getting the sink faucet and water hooked up were the next order of business:


We sorta buggered up the caulk around the sink by waiting to long to wipe it off the surface of the wood, so it's going to take some time to figure out what product to use to get it off, besides painstaking fingernail scratching!

I also requested the hooks bar to be installed so I could add some greenery to the space and liven it up from all the white on white on white!

There's still handles to install, light switch plates to install and ceiling trim to finish, but it's usable and very handy for when we need to wash hands after handling the chickens. Goodness, there are a lot of uses that come in handy that we took for granted when we were without a slop sink down there for a couple of months!

Not completely finished, but good 'nough for now!


One more close up of the chicks now they've matured a few weeks:


Their names are Maple, Flower, and Lacey, from left to right.

There are more projects accomplished this past summer that will be detailed in separate posts. 

And that's a wrap for the progress in the mud room!

Saturday, March 30, 2013

Tile Flooring and Cabinetry Continued

It was hard to sit down and write this one.  I have been really tired and lethargic---given my baby-growing superpowers....!!  For those of you who didn't know, I am pregnant!  So, Gabe has been working on the house by himself more and more.

Last I wrote, we had almost finished laying floor tile in the upstairs bathroom.  The next step would be to seal it before grouting it.  This ensures that the slate clefts won't be damaged by the sandy grout.  So, Friday, the 8th of March we worked to finish up securing the tiles down:


Again, I would select the tile and Gabe would diligently cut pieces and apply Thin-set to the subfloor and I would help "butter" the backs of the tiles and Gabe would place them.  Look at his masterful job!


Working around the toilet flange was a little difficult.  But, it was pretty nice that it worked out exactly in the middle of a tile!!

Tile saw and Gabe, in action:


And done with that part.

The next day, we can see a dry fit of more kitchen cabinets:


These will be installed after the microwave/range vent is installed.

Here is the start of the under stairs closet storage door:


Dad has been working on this using leftover heart pine pieces.  Here is the original door style we are going for:


On another note, the utility door jamb broke somehow, so this will have to be pieced together now:


The object of the day was to attack the tile in the foyer/downstairs bath.  I was going to be leaving mid-afternoon, so my job was to select the tiles and Gabe would then set them in Thin-set.  We prioritized the transition areas and doorways, so Dad could get Rene started on the doorway trim.  The first thing was to draw chalk lines and determine the direction of the tile brick pattern:


And this is what it looked like at the end of the day:

From the front door
Looking toward the living room threshold
We worked this week to order carpet for the upstairs also.  It was quite difficult because the one I chose several months ago is not there.  Or if it is, the name has changed and the price has been hoisted.  Ugghh.  So I selected another, that was actually a bit less.

we sourced Home Depot
The next Friday (the 15th), we continued filling in tile in the downstairs bath.  By this time, because of the work Gabe did around doorways, the door trim was (mostly) complete:

              downstairs bath door                                             under stair storage door frame

And we can see the utility door frame was fixed:

yay!
So, the plan for that evening was to get the bathroom tile laid and cut, so tomorrow, I could work with him early to select tile for the foyer space and then leave while he set it all in the mortar, since I would be leaving early again.

Looking into the bathroom:


Sink & shower area:


Toilet flange:


Moving into the foyer, first Gabe vacuumed up the space:


A photo of Gabe, posing nicely from out on the porch through the front door:


At the end of the day on Saturday the tile is set in mortar:

the "X" is a tile set last week, so it's safe to stand on
Next week, we move on to grouting the tile!!


The weekend of the 22nd and 23rd of March, we worked on grouting the upstairs and downstairs tile.

During the week, Mom had sealed the tile so we could move forward.  Look how nice the upstairs tile turned out!!


This is the product we used:

sourced from Home Depot
Here is the downstairs tile sealed and ready to be grouted:


Meanwhile, we had received appliances during the week as well, so here is a visual, even though they mostly look like big boxes taking up space:


This refrigerator is 30" wide, which is the most narrow profile of any French door frig out there.  With an ice dispenser too!

From left to right we have a frig, stove with microwave sitting on top, and lastly a dishwasher
Gabe also worked with Dad a little while on sizing the vent hole for the cabinet above the gas range and microwave.


I have to admit, Mom hooked me up with a comfy cot on site so I could occasionally get some rest, but still be around for the action....  She rocks!!  So....that is what I was doing.

Mom worked very well to sand down rough spots on the walls preparing soon to paint.  She also added putty to nail holes in the trim.

Later that day, Gabe and Mom (since I was down for the count) started grouting the tile upstairs.

Starting in the corner:


Looks terrifying at first!!  My beautiful tile!


I was there to wring out sponges quickly as they worked.

We finished around 8 pm, but the directions said we needed to wait two hours to then go over it again to remove the haze.  Gabe volunteered for this job.  He's an all-star I tell ya!!  So needless to say, it was a long day for him.  This is how the tile looked right before we left:


Looks pretty scary, but it will clean up nice!


The next day (Saturday), was another busy one.  First, here are a few pics of the grouted tile.  It still needs a good cleaning before the final coats of sealant.


Dad had finalized the fitting for the microwave vent, which was the piece holding up the installation of half of the kitchen cabinets on the north wall.

Here's the fitting and the cabinet, ready to go:


It will go in the hole from the outside:


Finally the cabinet and microwave can be installed!


Voila!!


At that point, I left since I wasn't feeling well.  Gabe and Dad continued hanging the rest of the cabinets on that side.  Yay!

Check it out:


The ones installed this afternoon are the two base cabinets: one drawer stack and one 36" double base.  Also, the wall cabinet to the left of the microwave was hung and will have a glass front when we are finished.

Dad and Gabe also worked to modify the sink base, since it is an apron front sink.  They took the drawer out and shaped it to fit.


The sink will fit like this:


I came back and brought them dinner after a good nap, so I was able to see progress on grouting the downstairs bath and foyer area.  Here are the all-stars themselves:


Once again, we had to wait two hours to do a final clean of the tiles to remove the grout haze.  We sent Mom & Dad home and we waited there together.  I actually got a second wind and was able to help Gabe out with the final clean:

Isn't he cute??
It's a good thing Gabe brought his computer to watch March Madness in the meanwhile!!


HA!!


Next weekend, we committed to being there for a three day weekend.  My Thursday class was cancelled due to Easter weekend, so we left to be there around noon on Thursday, March 28th.  Once again, I wasn't feeling very well, so I skipped out of the action.

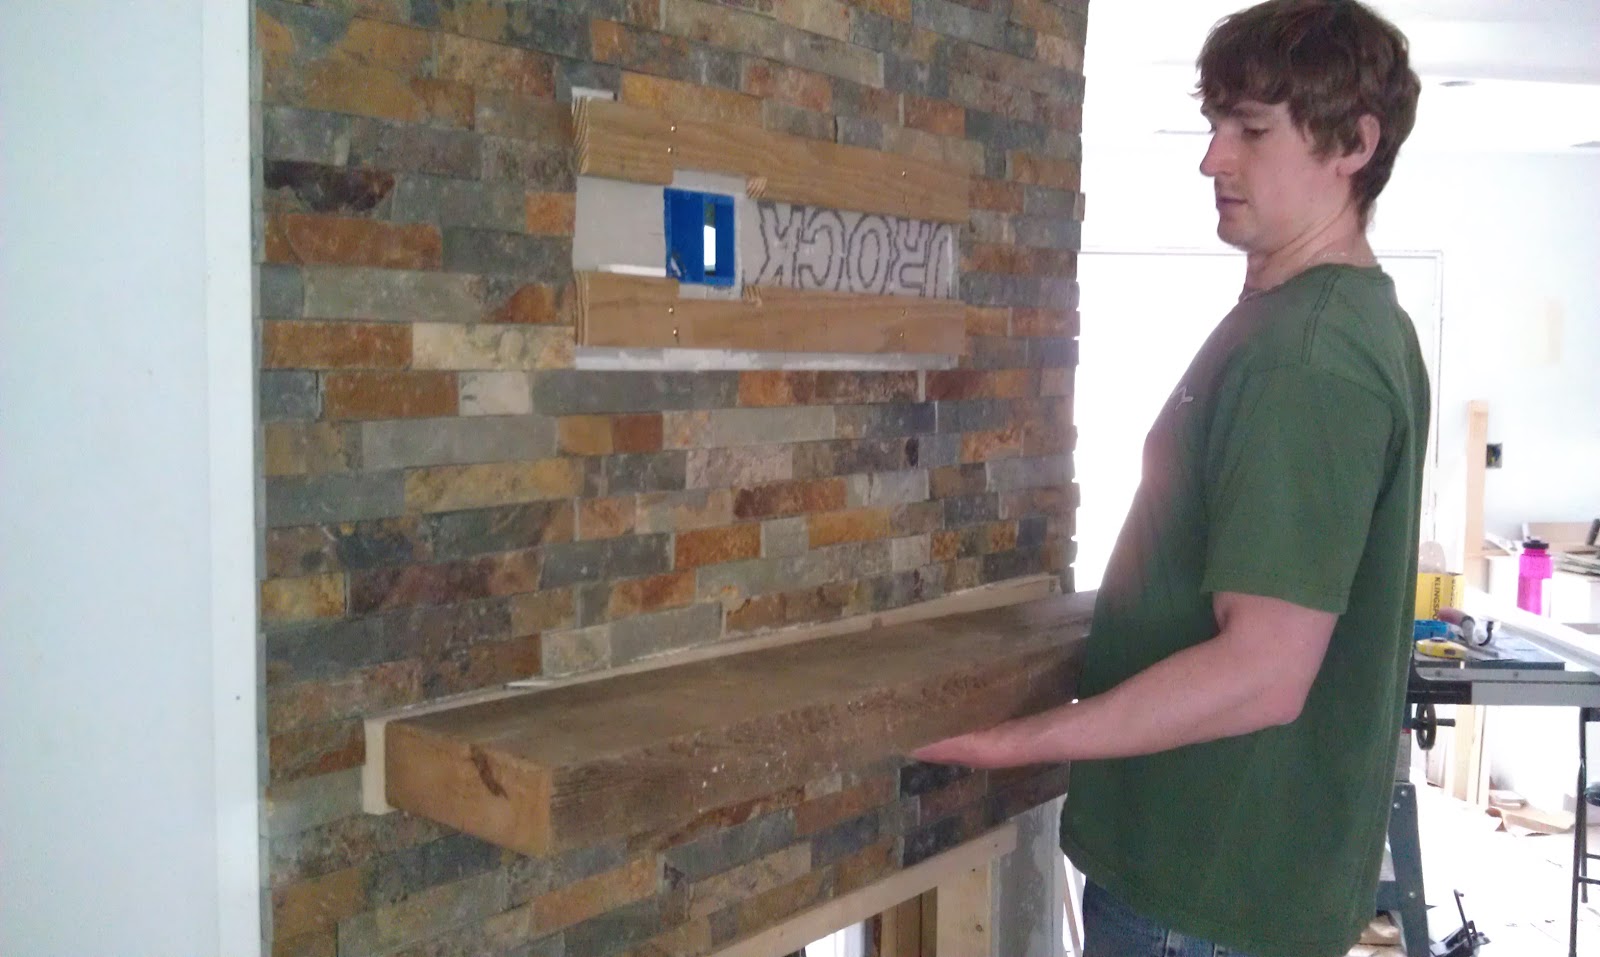
The order of the day was to hang fireplace tile.  I stuck around long enough to help Gabe determine the location of the T.V. wall mount and mantle on the fireplace wall.


He made a mock-up of the T.V. size, and held the mantle so I could see what it would look like.  Let me tell you, I am very excited about our mantle prospects.  This piece of wood is an original joist from under the house.  It is beefy and gorgeous.  Can I say that about a slab of wood?  We will give it a light sand and put a coat of polyurethane on it to install.

Then, he worked to change the outlet from a single to a double, and attached boards to designate the locations of the mount and mantle.  Gabe worked with subcontractor Rene to hang the fireplace tile from 4 until around 8:30 pm that evening.  I got to see pictures later that evening:


The next day (Friday), was a very productive day.  But I didn't stay very long once again.  I came to see the fireplace tile, did some sweeping and organizing, since it was chaos in there.  There were floor tiles everywhere, so I worked with Gabe to organize and box up floor tile that will be used to clad the shower stalls.  Gabe worked to fix the table saw switch, and when I left, he worked with Dad to install the final cabinets.

This is what I saw when I came to pick them up later in the day:

A soffit created
A niche created for the refrigerator:


The sink base (without the sink):


Rene also had a chance to continue tiling the fireplace wall:


Dad even took a nice picture of me and my man!


Saturday, I didn't go out to the house until late in the afternoon, since I was working on this very blog :).  Gabe and company prepped the ceiling for painting since we are angling toward getting the carpet installed upstairs in the next couple of weeks.  Mom worked on priming the bare wood door jambs.  

When I got there, Gabe had finished spraying the upstairs ceiling with this paint color from Behr:


It is intended to be a warm white.  I came to see if it was going to be an acceptable color to use as the trim and door color as well.  I think it's going to work :)

Here are a few shots of the ceiling--can you see the color change??

2nd Bedroom

Master Bedroom
He spray painted the upstairs vanity drawer stack (we couldn't get it in the Ice White Shaker--they didn't make it in 9" width):


Here are a few pictures of the kitchen in the daytime:


Here is a detailed picture of the work Rene is doing on the stair rail trim:


And one last task before we call it a day--attaching the grounding wire for the gas line:


It's a good thing it was a gorgeous day!!  Also too, having the windows and doors open to air out the fresh paint.

And we are off!  Gabe and I are pleased to be taking a week off of school and work to hit the beach.  It is a much needed break to have some quality time together.

Cheers!