Showing posts with label polystyrene. Show all posts

Sunday, October 11, 2020

Evolution of the Mudroom/Kitchenette

With Gabe working his day job every other week, we were able to accomplish more on the house than we ever dreamed!  Honestly, I had felt like the house to-do list was impossibly long and didn't think we'd get near as much done on the basement as we did.

First, let's talk about the mud room. The vision was to create a space that functions as a mudroom and a kitchenette so that when we have visitors down there, for a night or two or a short term stay, they can have a little bit of independence and privacy. We want to provide countertop space, a microwave and functioning sink. There is a fridge/freezer right outside the basement door in the garage as well.

We can start with a look down memory lane at we found the space in 2014 (after the furnace had been moved to the other end of the house--one of the first things we did when we bought the place in 2013):

The furnace would have been next to the door to the left

Let's go through the evolution of the mud room.

From the get-go, we had a large open basement space split up by this staircase that came straight down. Near the end of 2015, we worked to turn the staircase so that we could enclose a sizable bedroom in that area, with the stair entry and discharge shooting straight towards the basement/garage door.

More efficient, see?

In mid-2016, Gabe moved the water heater to the other side of the basement, to be enclosed in a utility room:


An old freezer was put in its place for temporary. Always nice to have extra freezer space!

As it can be seen, we housed our washer and dryer down partially behind the stairs. It was down there until around August 2018, when we had built a space for it upstairs in the hallway next to the master bedroom.


Before (10/2016) and after (9/2017) the doorway to the bonus room was built:


By Thanksgiving of 2016, we had moved downstairs to the basement bedroom and it would serve as the master bedroom until our major addition was done (we moved in to our new addition master bedroom Thanksgiving of 2018!) Zoe was downstairs in that room with us. It was a blessing that the room was large enough for all of us to be in there comfortably. We went from a 10'3" x 12'9" bedroom space to a 12'6" x 16'6" size room!

From the doorway of the mud room looking into the finished space:


Back to the mudroom.

It remained unfinished though, for quite some time! Through our major additions upstairs, from the end of 2017, through spring of 2020, we basically did nothing in the mudroom, besides infrastructure like plumbing and electrical which are hard to photograph into something meaningful :)

Finally, in the spring of 2020, when Gabe had some time off due to the Coronavirus pandemic shutdown, we had an opportunity to tackle the space and get it up to speed.

Here's the mudroom in March 2020, in all it's red lights and baby chick housing glory:


Not to mention housing (more or less organized-ly) shoes!


First order of business is to get the extremely heavy slop sink out of the space so we can drywall the back wall (he had already managed to put polystyrene behind for insulation).

Gabe keeping all the plumbing straight--I don't know how he does it!!


The metal base the sink sits on crumbled under the weight of the sink--thankfully it didn't land on my toe! --as we managed to set the thing on its side to get it outta there:


A little sweetie posing in front of the newly framed wall:


Another cutie "helping" daddy attach drywall to the stud wall:


Apparently I didn't get too many pictures of the process of insulating, drywalling and mudding the space. Here's one awkward one, and you can see some of the constant shuffling around of the furniture and tools in there until the flooring was down and cabinets were in to house all the things that were in there that needed storing.


We did the next part slightly out of order--we put vinyl planks down first and then painted. Chalk that up to my impatience to see how the flooring would transform further what had once been a dingy, dark, dank little intersection of a space!

Flooring going down as shown on the sink wall:


Panning right, you can see how Gabe handled the framing of the doorway/hall under the stairs:


First he put a header in under the stairs and cut away the triangular part that was jutting down into the walkway. There is a slight bulkhead in the ceiling where the supportive header comes down and panels cover it (the ceiling panels/trim are not entirely finished).

Stairs wall:


And then paint!


And then looking at the wall to the right, the door to the guest room:


Panning to the right again, looking at the wall adjoined to the garage:


We painted some panels to stick up on the ceiling:


Here's where it gets really fun! I have been staring at this UGLY window for a long time (over 5 years!) and it's super inefficient energy-wise. SO, imagine my excitement to get to REPLACE it!!!!  YAY!!!

Remember?


From the outside, before the deck covered it up:


It's not even glass--it appears to be some sort of shoddy plexiglas that will never fully clean off it's been scratched so much.

YESSSSS!!!!


Woo hoo! And that embarrassment of cords and wires in the upper left corner are our ethernet connections and routing for the entire house. Once Gabe wired the outlet that will go up in that corner, they will get neatly tucked inside a wall cabinet, as soon as we get it (it was backordered a few days).  You can also see the panels installed on the ceiling--just know the seams will be covered with a trim detail, in time, in time.

We picked up our cabinets, from our contractor friend who got them cheap from a wholesaler, in August (all except the backordered one), all for less than $1500. We had a few cabinets we re-used from the kitchen we tore out upstairs, but honestly, the base cabinet we were really counting on wasn't savable. Back in the throes of our major additions it was left out in the garage when we'd had a few floods in there before the drainage was taken care of properly. The cabinet got all warped and moldy on the back. So, it will be used in my pottery studio shed someday, but until then, we got a new base cabinet instead.


It's plain to see that we mis-aligned the cabinets and window, so that was a bit of a bummer. It will become more clear when the sink and faucet are in place on the sink base. I kept telling Gabe throughout the project down there whenever he'd fuss over some detail, "it's just a basement!" so we could get a move on and now, after I have harped on the mis-alignment, he likes to remind me of my statement, "it's just a basement!" Oh well. You live and learn. And you learn to live with your mistakes.

We bought a 12' walnut butcher block sheet at Lumber Liquidators mid-August and gave it a quick cut at 5' to transport it and will cut off the excess when Gabe's ready for the final install. For now, they are just resting on the surface, accumulating tools and junk. It will be a wider opening for circulation through to the bonus room, in time, in time.  The walnut butcher block choice is intended to be a more cost conscious nod toward the materials we have upstairs without upstaging them. I think it will come out beautifully once it's oiled and sealed up.


In the picture looking down the hall to the bonus room, you can see the slight drop in ceiling to accommodate the support piece that enabled Gabe to cut out part of the stairs.

Here's a little better picture of what the closet under the stairs looks like:


Looking back towards the door to the garage we installed a bench, some hooks and shelves:


This bench, Gabe worked to give a built-in look. Eventually, I'd like to replace or recover the cushion since white in a mud room is proving to be a baaaaad idea. The wall mounted shelf and hooks were not a matching set with the bench, but I think they marry nicely. The chrome hooks might get some spray paint at some point, but for now that's not high enough on the priority list.

Gabe installed some of the under cabinet lighting as well. One of the overhead can lights is flickering so we took it out and it's nice to have a bit more light on the subject! The sink will go right there in the middle and the bar with hooks will hold the fake herbs from Ikea :)


It's coming together!

And one more with the rug I bought! It's jute and should hold up nicely to the dirt and mess of a mudroom. The color is pretty homogenous to the flooring, but it doesn't bother me and feels like a subtle design touch without being showy. I am going to add cobalt accents to the space in the form of my pottery from college that have been in storage for waaayyyy too long ;)

You can see that the last panel that was missing on the ceiling above the shelves is now in place.


Gabe had to go back to work abruptly at the beginning of September so our plans to finish the countertop slowed down considerably.

First, Gabe filled a few small voids in the butcher block countertop with black epoxy. Then he sprayed them with shellac. Lastly, he painted on the polyurethane coating and they took up space in the garage for a week or so:


Did I mention we got baby chicks?


To say the kids are enamored would be an understatement ;)

Next, Gabe cut the hole for the sink:


And dropped it in!


You can see how wonderful the walnut looks here.

Getting the sink faucet and water hooked up were the next order of business:


We sorta buggered up the caulk around the sink by waiting to long to wipe it off the surface of the wood, so it's going to take some time to figure out what product to use to get it off, besides painstaking fingernail scratching!

I also requested the hooks bar to be installed so I could add some greenery to the space and liven it up from all the white on white on white!

There's still handles to install, light switch plates to install and ceiling trim to finish, but it's usable and very handy for when we need to wash hands after handling the chickens. Goodness, there are a lot of uses that come in handy that we took for granted when we were without a slop sink down there for a couple of months!

Not completely finished, but good 'nough for now!


One more close up of the chicks now they've matured a few weeks:


Their names are Maple, Flower, and Lacey, from left to right.

There are more projects accomplished this past summer that will be detailed in separate posts. 

And that's a wrap for the progress in the mud room!

Thursday, July 26, 2012

Finished (sub)Floors!

Insulating the floors was a task that required just grinning and get it done.  Crawling on the gravelly floor and nailing foam sheets to the joists from the underside does not sound like my idea of fun!!  It's a good thing my husband is a diligent man....of course Dad and I helped, but I think the insulation award goes to Gabe.

We had started a couple of weeks ago with the insulation on the dining room/kitchen side, but couldn't finish due to the roof support that was rigged up.  So, we rigged up another support that would rest on top of the floor joist, since it had been on a cinder block on the floor up until then.  Gabe finished it up and then crawled out the crawl space entrance:


Dad and I worked to cut the material around the rubble foundation, which took couple tries:


After that was done, it was pretty much smooth sailing until right before the end.  I was gopher extraordinaire (and photographer) which was pretty necessary that day, as it's really inconvenient to get anywhere when you are stuck working under and in-between floor joists!!  Here's a couple photos of the guys at work:


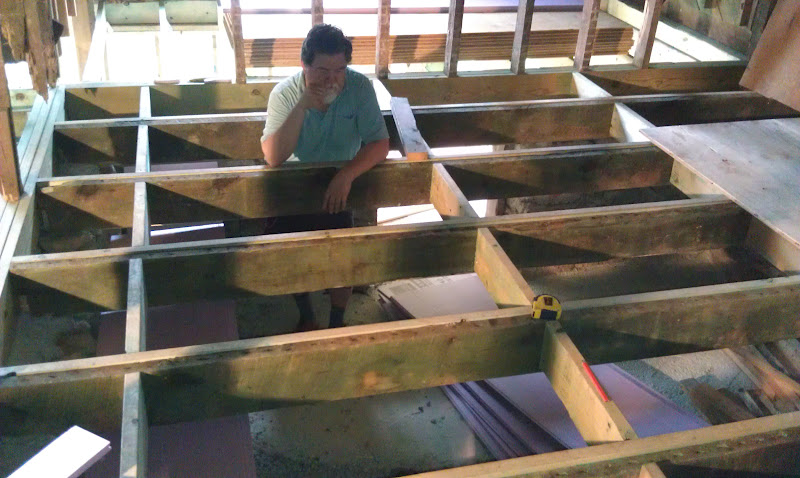
He is willing the tape measure into his hand
Here is a shot of more cut polystyrene around the foundation:


I had to get a picture of Gabe from the perspective of the crawl space!


Home stretch for the polystyrene....


We also had a neighbor stop by to offer to bush-hog the backyard.  We gave him a set amount and he started mowing and weed whacking.  He came back the next day with a different attachment.  It was a good thing, since the grass had gotten hay worthy and we didn't have a mower on site.  How nice!!

The next day, after a delicious pancakes and bacon breakfast, I went on some errands with Mom while Dad and Gabe got started on the house.  As soon as I got there around 11, Gabe was eager to tell me he had a task for me.  Yesterday, I had been getting a bit disillusioned about my helpfulness (as a gopher) so giving me an "important" task was a good move on his part!  :)  His back had been paining him lately so it worked out for me to be the one to staple down the fill insulation.  They had cut plenty of fill insulation and stapled a few of them in place, so I had my work cut out for me (haha).

On a slightly sour note, a couple days previous, Dad had visited the site to find someone had dumped some spoiled food in our dumpster!!  Needless to say, we were not pleased.  Boy, did it stink!  When we got there on Friday, Dad and Gabe dug and dumped dirt on the problem areas, since getting the dumpster removed would be too expensive, since it wasn't even half full.  When we got there on Saturday, more had been dumped!  This time, it was less offensive, being weird old things, including some Spiderman bedsheets.....sheesh!  Here is a complimentary visual:


Not to mention the signs I picked up that morning reinforcing the message that we do not want anymore such items in our dumpster!


So, Saturday, we had quite the system worked out, Dad would cut the insulation pieces since he was donned in long sleeves and gloves:


I would staple said pieces to floor joists---here is a video to detail the experience:


Boy, were my hamstrings sore after a day with that staple hammer   !

And Gabe would employ himself with things like fitting the insulation into the holes so I could be an efficient stapler ;)


Sprayed Boro-care on plywood to go on the floor:


And move plywood and tools from one end of the room to the other, so we could get the insulation under there too.

Mom stopped by and we had a nice picnic lunch right in our living room!

How lovely--split pea soup and egg salad sandwiches taste so good to the laborer!
The funny thing about putting insulation in the floor is that it provides a false sense of floor, because a foot would go straight through if you try to walk anywhere but the floor joists!!  

Ta da!!


Dad then left for the day around 4:00.  The last task was to somehow seal the leaks in the roof so that the new insulation laid wouldn't get wet.  The north addition has a sneaky way of being wet every time we come on the weekend.  Sooo, Gabe asked me to get the ladder out from under the porch, and no sooner did I step foot under did a wasp sting my leg!!  So, I sat that last chore out while I nursed my bee sting with a mud patty.  I remembered a tip from my youth to do so since it would draw the sting out (had it been that long since I had been stung??!?).

Gabe spent a good hour up on the roof finagling around with a sore back and without a helper.

Now the only thing left to do before the plywood subfloor gets glued and nailed down is an inspection. It was scheduled for the next Tuesday.  Lo and behold, it passed and we could move forward!

~~~~~~~~~~~~~~~~~~~~~~~~~~~~~~~~~~~~~~

The next weekend, I wasn't going to make it out on Saturday.  Gabe unexpectedly had to work late on Friday, so we didn't make the trip.  Gabe went by himself and made a day of it with Dad on Saturday.

Apparently, the plastic Gabe put on the roof worked for the most part.

At least he took pictures of the new floors!!

Here are a few:

They started with the southwest corner
They had to cut the 4' X 8' sheets at the ends in order to stagger them.  Notice these boards have been sprayed on the side facing down with the Boro-care, the mildew, mold and termite resistant treatment, previously and will be sprayed on the top face later when the framing gets sprayed.

It was a lot of bending over to glue and nail every board down, so it was a good thing Gabe bought a back brace for the task!


The studs running down the center of the building, right under where the metal I-beam will be placed that will later be removed, needed to be braced while the subfloor got slipped under them:


And then temporarily re-supported:


Remember this?


Now this:


Just notice the exhaust pipe in both and the door hole boarded over in the second.  Major transformation, huh?

The last corner was particularly hard to get nailed into place since, once it is down, it is hard line the grooves up into the edges.

Voila!  if I do say so myself :)

Looking one direction

Looking the other direction

The rest of the floors (in the existing bathroom and porch areas) will not be insulated, so it will be easier to lay those floors.  Also, since the floor joist run perpendicularly, plywood will need to be cut lengthways, requiring our table saw.  So, next weekend it is!  We also plan on removing the rest of the heart pine floors from the upstairs and meeting framers to discuss the next plan of action: FRAMING!!!!  

Soooo excited to see the structure come together.......

'Til next time!